Showing posts with label free. Show all posts

Friday, November 29, 2019

Friday Finish and Freebie!


This week I made another stocking from the stocking design I found at Cheri's facebook group. I used designs from her old books and added my own touches. Now I have one on each side of the skinny walls, that are on the big, useless opening in our kitchen. The wall will be coming down and we plan on putting in an island.

For now it is a great place to hang things. I hung it on a knob with better lighting, but I can never get a good shot of wool items.


Tuesday was a beautiful day and I wanted to get out. No crowds and Bean got to enjoy getting out too. This is how Bill looks for glass, I was digging too, lots of rocks with glass, hiding underneath.


And we found some nice pieces this time. I really need to organize what I have found lately and start making things. Winter is a great time to create, so hopefully I can get more done this year.


And for this week's freebie, a fun little star that I saw online and no idea who made it, but it did have a pattern. I redid it a bit and made the hat simpler, as well as changing the face. I like things I can make up quickly, since these are things I give away. I think it will definitely bring a smile, to the recipients face. Something fun to make and you can change it to suit your needs and change the expressions. I may do some with button eyes.


And here is the pattern, simple to make with felt or wool. You could even sew some with lighter fabrics. I hope you all have a wonderful weekend.


Friday, November 15, 2019

Friday Finishes!


This weekend we went for a few drives and found out, one store was closed on Monday, but the good thing was, Colchester Mills was open and I was able to get some nice muslin and a new pattern, as a treat.

This design is by Blueberry Backroads, called Just for You! I love the fact that it is small and has the perfect saying for gift giving. I made the first one into a pillow, but they also have a flat version. I think the flat one would be fun to fill with balsam but I didn't get any this year. It is also nice since the flat version can fit in a small yellow envelope, along with a card.

I gave it a little color and some bells.


My freebie for the week was a design I found online, a simple tree with cut out hearts, but I decided to try some of my buttons. It was simple and quick to make up, so a great giveaway item, and something simple enough for kids to do. I think I like the smile face trees, better.


I saved the site these came from, but it seems to be an iffy site, isn't taking me to the same post, so I am including the pattern I downloaded and it does have the name of the site it came from. I wouldn't bother though, I already cleaned out my cache to be safe.

I hope you all have a wonderful weekend. It is going to be cold again, so we won't be hitting the beach, anytime soon.


Friday, November 1, 2019

Friday Finish and wanderings!


This week I tried a stitchery from a free painting design at Deco Art. I modified it a bit so it fit into a smaller square, since it is something I will give away as part of my DSmiles4miles group on facebook. The material was horrid to work on and the photo makes it look, even worse.

I think it is a fun design to give to people during the holidays, we can all use a smile. It is a painting on wood, so I maybe see if I can find some mini wood pieces and paint some, It is a fun design and easy to do, even if  you are not a painter. It could also be adapted by making the bird with applique, which I will try too.


We also got an extra day this week, since my husband had to work on Sunday. I picked Tuesday since the weatherman said it wasn't going to rain. It didn't rain but it misted all day, so it was damp and wet and we got out for a ride, but most visits to places had to be quick, so we couldn't enjoy any long walks.

One place I had seen online was Pumpkin town, we took a little detour and I got a few shots from the road. It wasn't worth going in, since it was too wet, but it would be a fun place to take the boys, next year.


This guy was hitch hiking on the side of the road.


We were lucky that the mist stopped long enough to visit the falls. I found a new function on my camera, so I was able to take a nice photo with a smooth look to the falls. It was gorgeous and the area was surrounded by color, but too wet to hike up the hill to the view point.


And no visit to the park would be complete without a photo at the covered bridge.


I got photos of churches and grave yard stones along the way and our last stop was the castle. I really wanted to see the views from above the river and the castle would give me some cover from the mist. Well, it was closed for repairs, so no castle this time. We went down to the ferry landing and watched the ferry go back and forth, this one is fast and always on the move, since it is easier than driving to a bridge area.

I thought it was fun that they decorated the area.


Tomorrow we are going to try another ride, this time going down the coast to an old coastal town, then up river and back across, and hopefully the castle will be open. I plan out our route online and look for interesting things along the way. So, a few old cemeteries, ocean views and hopefully some eagles along the river. I hope you all have a wonderful weekend and made it through the last storm without damage.

This is what I woke  up to, but at least no trees fell this time. Bill had started putting up new sides and they made it through, but all the old ones are gone.


Friday, September 13, 2019

New Pattern Winner and a freebie for all!


I was able to finish the new pattern this week, though it took longer than usual. The last fall landed me on my elbows, so my arm is still recovering from that. I made it larger, which actually makes it harder for me, I am better with smaller designs and detail.

The punching is not the best and I wish I had gone out and gotten new floss, but I love the design and how it is a bit of history and a bit of whimsey.

The lighthouse is the Ledge Lighthouse which is off the coast of Connecticut, which is reported to be haunted. The perfect place for the ghostly sailor to sail by.

And to add to the fun, guess what number the generator picked? Lucky number 13, lol! So, the winner is Rugs and Pugs! Please send me an email and I will attach the pattern to the return mail.

The finished piece is 6" x 7". I have added a button to the side bar that links to my selling site. For some reason, PayPal is not letting me use their code for a link, so this way you can see the pattern and link to that, to purchase one, if you would like to make your own. This would be fun as a rug, or applique, which I may try myself.

The colors are better in person, I needed to keep it light for the pattern and printing.


And for those who want to make something fun for Halloween, I have gotten permission to share this older pattern. I did the piece and the write up for the magazine, Mercantile Gatherings, from Tiffany's design. I miss her website, lots of freebies and wonderful prim designs.

Have fun and remember to give credit to the designer, when posting a photo. You can use Primitive Blessings, which is her old store name.

Have a wonderful weekend!


Friday, November 9, 2018

Friday Finishes!


This week I finally finished my Christmas painting, a free design found at Artist's Club. They offer downloadable patterns and lots of free ones. Of course I couldn't follow the directions for shading and changed up the colors a bit, so not perfect, but a fun piece.


I also made a pillow from Kathy Schmitz's, One Stitch Club. I was hoping for a holiday design, but this one is still beautiful and will make a nice gift. I added some lavender, with the stuffing.


I also made pillows out of the stitcheries I made last year and a few new snowflake pillows, all filled with a mix of stuffing and balsam. I got 3 bags of balsam, so I will be making a lot of smaller pillows with fun prints. I liked the red snowflakes, perfect to add the snowflake buttons to. The Annie and snowman are free patterns from Free Christmas Coloring pages.


 We still have color on some trees, but a lot of trees are dropping their leaves. Bean is quite  happy with the mess, his favorite activity in the fall. Have a wonderful weekend!


Friday, November 2, 2018

Friday Finishes!


This week I was able to finish a few things. I am trying to do at least one UFO at a time, along with new pieces. I have so much that I never finished so I am doing the ones for Christmas first, then I can decide on the others.

This is a free design that I have been wanting to do and finally got a chance. I love making pillows that I can put around the house and this one was quick and easy to do. The original design was on a  wool background with snowflake stitchery, but I decided to use snowflake fabric.

The design is by Karel Hamilton and you can find it at her facebook group, Wool Appliqué Love.


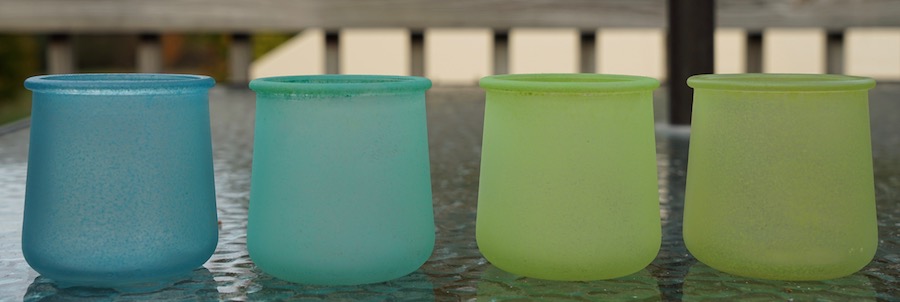
I also got some new frosted paint and tried the oven bake method. The two jars in the middle have been baked. It does set the paint and makes it washable, but I think it looks dull and thick. It also emits a paint smell, while baking, so not a good thing to do, unless you can open the windows. The others are done with a mix of decoupage, one I added too much so it looks more spotty, so more paint and less decoupage, just enough to thin the paint and give it a bit of a sheen. The one I use is an antique decoupage, so it keeps the look of old glass.

You can see how the new blue looks, compared to the jade, which looks more green. They are more bright looking, than they are in person.


Another thing I finally finished was my snowman block from last year's BOM, from Buttermilk Basin. I am going to keep mine as is, with a fancy stitching on the lines, and a small border, so I can use it as a hanging on a curtain rod, for the front window.


My son sent a photo of the boys, Nick wanted to be a football player, so that is what they both went as. I think Alex fits the part much better, lol. He is such a character.


I hope you all have a wonderful weekend. We have rain again, so I doubt we will be able to hike up the hills, since everything is wet and slippery. The last of the foliage is coming in fast in our area, so I am hoping we can catch a few more places before it is gone.


Friday, September 14, 2018

Giveaway Day!


I decided to do a giveaway today, I hope you like what I have chosen. This week was recovering and catching up and heavy cleaning, so I didn't get to finish my new project. My sister is coming next week, so I want to get everything done, so we can enjoy having fun together.

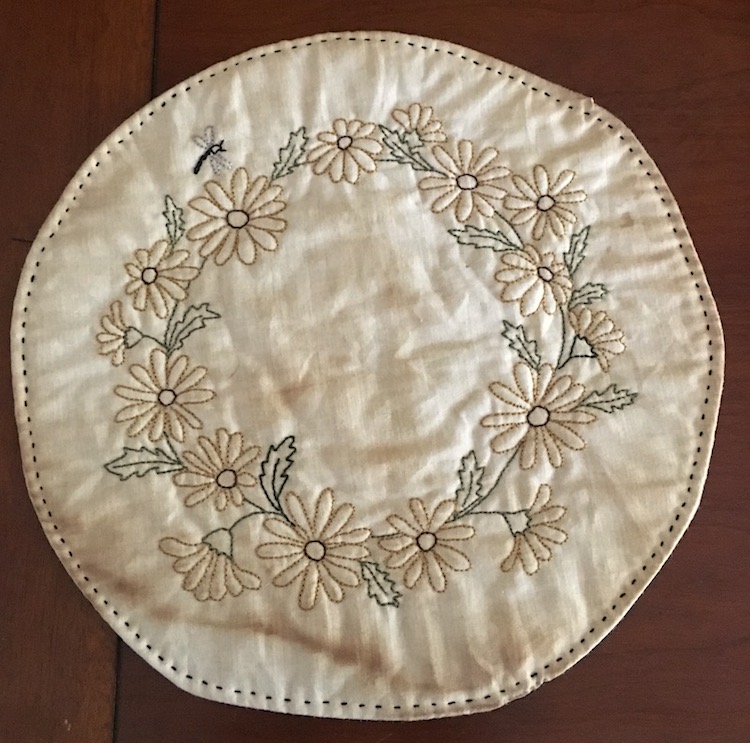
This mat I made awhile ago, it has been sitting in my box of goodies, so I think it is time to let someone enjoy it. It is stained but not too dark and would be a nice mat for a round table or beneath a candle holder. It measures 9 1/2" round, even though it is a little wonky.

This piece is nice for spring or fall. To enter, please answer any of the following questions. Do you have a favorite craft supplier, who has good prices and sells in bulk. I am looking for small driftwood pieces or ornaments made with barn wood, unfinished that I can use for the glass or other items.

Or this question: If you have a cat, what is the best litter box. Moki is pre diabetic so I have to feed him lots of canned food and lots of water, which means lots of cleaning. It is a mess and smelly, and was wondering if there is actually one that cats will use and omits the mess and smell.

And if you don't have a cat or buy craft supplies, any housecleaning tips? Ways to get more done in less time when you live with a slob?

I hope you all have a wonderful weekend. This contest is open to all of my followers and will end next Friday, September 21st. I will announce the winner that night. I also have lots of Christmas goodies in my box, so there will be another giveaway before Christmas.


Friday, January 26, 2018

Friday Finish!


This week I made a new piece, A BOM from The Little Red Hen, a new group on Facebook called Wooly Mysteries. There will be a new block each month and it is cat themed, my favorite subject to create.

I decided to do mine scrappy, using striped homespuns from my stash and old thrift wools. I added a mouth to mine, each one will be different but similar, since I do mine by hand and my hand has a mind of it's own, so that is what creates the personalities.

On this one I used green shades, the body is a men's jacket that I over dyed with a greenish blue, it got washed out in the photo.


I also got all my stockings prepped and ready to sew. I use freezer paper and decided to cut out the shape itself, before cutting the stocking. I was able to use the same piece for all five stockings, which is a nice way to save on freezer paper costs. What I did was, iron on the stocking shape, then I put it on the table to have a harder surface. I used my General's pencils to trace the design around the freezer paper, then removed that and cut out my stocking, 1/4" from the chalk line. It made it easier for me to judge the cut around the line. It also makes it easier to turn under, since you can use the lines as your turning edge. The pencil does make the line outside the original line, so you need to compensate for that, by turning the chalk line under, but it still works, even if your stockings are not the exact size.

This is with the white pencil, they also have them in colors, if you are working on light fabrics.


And this is how they look, when done, not perfect, but much better than my usual wonky applique. I will wait till I make the next three, before I decide placement. There is also a sashing and a middle section, so I think once separated they will look much better.

I hope  you all have a wonderful weekend and hopefully it will be warming up in your area. I am going to get out early to catch the tide and look for more beach glass. I have been collecting ideas for things to make for my beach room.


Friday, December 1, 2017

Friday Finishes and a free pattern!


This week I have been busy cleaning up after the holiday and decorating for the next one. I find myself more in the mood this year, I put out more of my decorations and more lights. I think the kids will love seeing all the decorations and lights when they visit, kids do make the holidays more joyous and I am blessed that I can spend as much time with mine, as I want.

I decided it was time to make one of my patterns from Buttermilk Basin. I love the cut out shapes and they fit nicely on the wall, in smaller spaces. I changed mine up a bit, adding button eyes and snowflakes instead of stars.


Another thing I wanted to try  was an ornament that I saw in my Craft Gossip mail. I followed the link and there was no pattern, that I could see, so I made up my own. I found a similar shape and made a printable, and printed it out on card stock. It isn't real clear, but good enough to print and cut out. I had some music note paper and cut that out in the same shape and glued it on with Elmer's craft stick glue. I used buttons and a button carrot nose, as well as a scarf, all done with the same glue. I wasn't sure if it would work, but everything is staying in place. With the snowflake button, I sewed that on with a thin quilting needle. This was a fun and quick project and you can use different types of paper and items that you have around the house. Great for the kids too.


I am posting the template, that I used. It will print out clearly and you can easily follow the shape, to cut it out. This can be done on a wood cutout, as well, most craft stores carry them. Another option would be to use fabric. Or if you want it to be more prim, you can spray it with walnut spray or add glitter, lots of possibilities. I hope you all have a wonderful weekend.


Friday, November 17, 2017

Friday Finishes!


This week has been slow and I was working on one of my stitcheries. Then I decided to make a pillow for my beach room and yesterday, I spent most of my day, working on it and finished the pillow top and today I was able to sew it up.

It is a design by Kathy Schmitz for her One Stitch Club, and I made a small pillow but this one is 18" square and a start for my pillows in my beach room. I wanted to use blue jean appliqué with rough edges, but not sure if they will fray too much, I used iron on fusible, so maybe I need to do the larger ones without?

I changed the design up a bit to fit the size and kept it simple, I don't want the pillows to be basic, this one is more than I planned. The others will be a simple blue jean appliqué shape in the same style pillow, in a 20". I saw similar ones in a store and they were asking 60.00 for one, so it is nice to be able to make my own.


I am also working on a stitchery by Cheri Saffiote, a freebie pattern for her Facebook Group. I am making this as a gift and later I will add the names to it, but for now I need to finish the main stitchery and then decide on a border.

I hope you all have a nice weekend. I found a place that will take our old VHS tapes and put them on disc, so we will start out with a few at a time. It is only 10.00, but I want to try a few first and these I know have our kids on them, the rest we will have to sit and watch to see what is on them.


Friday, September 22, 2017

Halloween Fun!


This week I worked on finishing my candy corn rocks. I love the simple rocks with fun faces and this is a fun way to make something that fits with the season. I have decided on a group name so I could add it to the rocks. It will be called Smiles4miles! This way, anyone can join in, and no limitations on where you live.

I still have to work on the Facebook pages and I plan on doing up some tags that you can print out. They will have the group name and a saying, so all you have to do is print them and add them to your pieces. This is for any crafter or artist and you can also join in to learn and explore new ways to help others.

On the back of these rocks I put smiles4miles and since some were larger, I added, smile at the next person you see. I thought that would be fun and on the tags I usually add a similar saying for those who find the items, so they can pass along an act of kindness.

I still have to put on a few coats of finish, but I had to get the name and writing on tonight, then I let it dry a day, to be safe. It is windy and rainy today, so I will have to wait for better weather, to spray outside. Hopefully tomorrow afternoon, then I can drop a few on Sunday.

I will also be doing heart pillows, another way to join in, sewing offers lots of possibilities, especially with the holidays. If you want to join early, you can go to Smiles4miles on Facebook. I would also like to hear your thoughts and ideas. I want to keep it simple, fun and a compassionate group of artists and crafters. Hopefully I can get all the information and files done this weekend.


I also needed to make something new, every so often I like to try something that I can do in a day or two. I actually made this in an afternoon, and it does look it, lol. I was trying to follow directions on YouTube and they tend to talk a lot and I get impatient and start scrolling through fast and working on mine and the next thing I knew, I was off on my own in the wrong direction.

I wanted to do sculpting, but with their method of using yarn for the sections, my area was too small, so I just did a bit and made it goofy. I had fun making it and it does look better in person, I couldn't get an outdoor photo and flash really brings out the fuzziness, that isn't there. I learned what I did and didn't like, while making it, so I may just try another, or maybe a pumpkin head doll, we shall see where my mood takes me.

I definitely went whacky on the top, reminds me of Miss Piggy, lol.

I hope you all have a wonderful weekend. Of course I will be outside as much as possible, some nice warm fall days and the antique barn is having their annual sale and raffle. We won last year, so maybe we will get lucky again.


Monday, March 20, 2017

Stitcheries and Scenery!


This week I received a newsletter and noticed a free stitchery. I realized that it is a monthly stitchery and each one has an inspirational saying. I missed two, but was able to still get them, so if you are interested, you can get all of them still, to catch up.

This is the latest one, I worked backwards. I think it will make a nice gift and I am doing mine in a smaller version for either a wall hanging or lap quilt. I left some extra, my blocks will be around 5" and maybe a red floral print for sashing. You can find the designs at Suzy's Sitcom.


My latest fall has put me in more pain, so I can only do so much. Today it is mostly rest. This weekend I really had to get out of the house so we drove to the light house. It was a bit windy and cool, but it felt so nice to get out in the fresh air and walk around the circle.

I took a close up, wide angle of the light tower. We ran into a man who liked to talk and told us about his dad who ran the lighthouse at one time.


Lots of people like to bike in the area, too many hills for me. You do not want to be going by, when the fog horns go off.


On the way back we passed one of the many farms and I saw a scene, I had to stop and get a shot of. The goats were all trying to get at the hay pile, but I couldn't get close up, lots of wire fencing and a large dog who was guarding them. I would love to live on a  farm like this, they are on the salt water inlets and have amazing views of the bays on both sides.

I hope you all have a wonderful weekend and an amazing week.


Monday, March 13, 2017

The Ugly Angel: Free Pattern!


I wanted to try an angel and I found a wonderful pattern by CatNap Primitives. She also has a free bunny and other wonderful patterns are reasonable prices. It is a freebie offered on her site, at Patternmart.  If you click on the main menu for patterns, click on free and you will find a lot of other free patterns. I like the idea of making my own but I wanted to try some simple dolls and techniques to get some practice in, it's been a while since I have made dolls.

The original pattern is for a tree top angel, but I wanted to make it for spring, so I changed it up a bit. Then I decided to make a satchel bag to hold flowers, but I made a mess of that. I plan on making a calico one to replace it. It was fun to make, but I definitely need practice on my stitched mouths. I think it would be fun to make them as gifts and customize them, to fit the personality and tastes of the person who receives them, so I will have to work on some of my own ideas. I do have doll patterns and a doll clothing book so I can do different styles.

Another mistake I made is, I forgot, if you wet the piece first, do not saturate it with stain, it tends to pull up in blobs. I was able to tone it down a bit by rinsing it back out.


Tomorrow we are getting a storm. It was a blizzard, then a storm, then it went from 15" down to 6" in our area, so I am not complaining. But, we all know weather has a mind of it's own, so we shall see how bad it gets. Of course I had to get out for supplies, crafting ones, lol. Today we got food items so we are all set. I hope everyone stays safe and warm if you are in the storm's path.


Friday, August 5, 2016

Friday Freebie and Winner!


Thank you all for entering my contest, it was fun reading the comments and quips. The winner of a free pattern is Kim Budash! Congratulations Kim, you can pick any pattern from my E-Crater store and email me with your choice.

For everyone else, I thought I would offer my newest idea as a freebie. I wanted to try a technique with Press and Seal and I have been wanting to make something as a gift that I can give to members of our choir, especially the ones who sang at Dani's funeral and I thought this would be a wonderful gift for them.

As for the press and seal, I liked it in one way and not in others. I found sewing through it, hard with the larger needle that I use for pearl cotton. It stayed on but the lettering faded as I went and I used a black art pen on dark wool, so I am sure that didn't help either.

This is how it looked with the stitching on the Press and Seal.


It pulled off fairly, easily but then I had to get around those small letters, that was not easy. I pulled and the stitches pulled so it messed a few up. Then I realized it would be easier to clip as much as I could and that made it easier to pull out the pieces between the stitching. Once I got going, it went faster. I also messed up on some spacing, and I guess it shifted a bit, the design is not perfect and I had a hard time following lines with the chain stitch.


I took out some of the stitches on the wing and fixed it up a bit. I cut out a second piece of wool and a piece of batting cut smaller than the design and blanket stitched them together. Then I added some leaves and red balls. I used pearl cotton through the top and put the leaves on top of that.

This is how it came out. I am not thrilled with this one, the wings are a mess and I think the lettering needs to be lighter? You can also add a bell to the bottom, this one is rusty but I may use new ones for choir gifts. What I want to do is try another but make it neater and not so prim, as the gifts.


Here is the pattern I used, you may use it for yourself or as gifts. All I ask is, if you come up with a better look, please share. I really wanted to make something special and I think this is a wonderful idea as a gift so please share you pieces with us and better ideas to make nicer lettering.

I hope everyone has a wonderful weekend, filled with joy and adventures.

The bell is 5 1/2" long, but you can make it as small or large as you want. I think this would be nice in a larger version to put on the wall.


Friday, March 11, 2016

Friday Finish!


Well, as usual my week didn't go as planned, but I got one thing finished. Our nice, first week of spring ended up with a tick, so I am back on lyme treatment and they gave me a tetanus shot since it was embedded in my skin.

I was going to make the quilt and my machine decided to give me problems and I finally gave up, so I may just make that one into a charity quilt and do tumblers from the blocks I have and add more to them. I doubt she would take it with her since she plans on filling her suitcase with diapers, they are expensive over there. Nick got new bunk beds, so I can work on quilts for his beds and a matching, larger one for when they come home. Luckily I bought some starter clothes and a car seat, so I have gifts to give them tomorrow.

I finished the second block in Buttermilk Basin's 2016 BOM, I am loving this one and I can't wait for the next one and finishing it. It is going to be a wonderful quilt to have for next Christmas. You can find the free block under Mystery BOM.

Another freebie this week is offered by Theodora Cleaves. She is offering her Paris Ladies for free. They would be fun to stitch or do in appliqué and a great idea for gifts by customizing them to your friends likes and personalities.


On fridays I like to post a photo and a saying to my daughter's Facebook page. I found an old photo of me with the kids, one Easter. I am not sure why I am so serious and Billy looks like he is ready to pop, lol.  I hope everyone has a wonderful weekend, I plan on getting out and enjoying the nice weather, hopefully no ticks this time.


Monday, January 11, 2016

Free Punch Needle Heart Patterns!


Next month is Valentines and I thought it would be fun to try some new hearts. They are easy to do and something you can make in a day or two.

The punch needle hearts were done with DMC floss and I used a #3 for the design and a #1 for the background to give it a raised look. After punching the design I used a piece of red wool for the back and stuffed them. The edge was done with wool yarn that I sewed on, gathering it as I went around to get a little scalloped edge. I started from the center top and left the ends long enough to make a hanging cord. Perfect to hang on my valentine tree.

You can also hook these or do them in appliqué or stitchery. The finished hearts are almost 4" long, but can be done in any size you like.


Here is the patterns for the hearts, I did them mostly by hand, so the patterns are not exactly the same.


Another thing I tried this week is woven, fabric hearts. I drew out a heart design on a piece of card stock, then traced that onto a piece of light fabric, with a water erasable pen, but you can use anything to trace the design on, you will not see it in the end. I laid strips of fabric across the heart, making sure I covered all of the areas and pinned them on, to keep them from slipping. Once I had the heart covered and pinned, I cut away the excess fabrics, leave about an inch, all around.

I sewed the strips onto the heart, using 2 strands of Dmc black and a running stitch. You just want to sew the edges of the top pieces, not across the areas that run under the tops. This way you keep the weave look and not block them off with cross stitches. Once they are all sewed down, you can cut off the excess fabric and sew the front to a backing. I used a floral print to make it pretty on the back. I stuffed mine and then antiqued them with walnut spray. Since they are bowl fillers, I kept them as is, but you can also make a hanger to hang from a knob or rack.

You can use a fabric heart to back the strips, or fusible would work nicely too. Just make sure you have the strips laid out and tightly together, before you iron them down. This is a great way to use up scraps. I may try some small pillows with an appliqué, next time.