


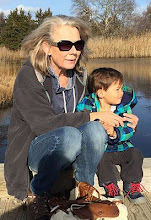


This week I am still experimenting with photo art and one type I tried is, attaching the photo, face side up. I had Bill cut out a piece of wood, but it is thicker than I would like to use. I like the thinner slat boards for art like this, but I wanted to test it first, before I do anything on good woods.
I like it in one way, but not sure if it is the thick wood, but not thrilled with how it looks. I think trying it on a white slate board, would look nicer for this technique. It is fun to try my photos in art, though.
With this one, I used decoupage to adhere it to the wood and then a coat, over the piece, then finished with a glaze medium. I also aged it a bit before I glazed it, with antique medium.

Another test was with a butterfly photo. I used the glaze medium this time and when I pressed the photo down, the colors started oozing out, so not the best medium to use. But, I was pleasantly surprised to see their was a nice print underneath.
I also used regular printer paper, which is thinner, so that may have left a better print but it was a pain to get off, the paper adhered with the glaze, so I had to be careful not to rub the design off. Overall it worked nicer than the first one with decoupage. I do think a heavier paper is nicer, so I will see if I have one without ridges. I will also try a heavy gloss gel medium, that I have. I have plenty of mediums, so fun to use what I have, to save money as I experiment. Most people seem to use the gel in this method, so hoping my heavy will work. I will also try the glaze with a heavier paper, I do like how it came out, overall.
As Michelle mentioned, most tutorials use laser printers, I am using ink jet, so you will get more color bleeding with that, but it lends to a more artistic look. I am also using cheap mini canvas squares, so not the best surface.

Another little project was a pillow I made, using a design by Ginger of Primitives by the Light of the Moon. It is a free design that she offers on her blog, along with others. I used my colored pencils and was not pleased with the look. I was trying to blend and make it look more like watercolor. I added some extra stitches, so I think that helped cover the flaws.
I did hear about using blending stumps, they look like fun to use and not expensive, so I will try those, on my next colored piece.
This design would be fun to do in punch needle too. I hope you all have a wonderful weekend!

6 comments:
I am enjoying your experimenting. Thanks for sharing.
Love to see your finishes always so wonderful I love the photo great job
cathy
I love the effect you are getting with the photographs.... so soft and delicate. that's a sweet cushion too...
Hugz
All three of them really turned out well. It’s nice to be able to experiment like you’re doing, and get some pretty finishes. Keep up the good work!
You are so smart to practice and experiment as you do before plunging headfirst into projects like I do LOL. I do like the soft effect you achieved in the photo transfers.... and I absolutely love the saying on the sea gull photo.... Hope your weekend is off to a great start...we are warming up, but not are dealing with fog, freezing rain, and ice. Gah!!! Smiles & Hugs ~ Robin
Oh those are pretty! I like the effect better when it's a little faded...gives it a more interesting look. Have you thought about painting over one? Like a collage?
This is making me want to put my other projects aside and start printing again lol!
Post a Comment