Showing posts with label colored pencils. Show all posts

Friday, March 5, 2021

Friday Finishes!


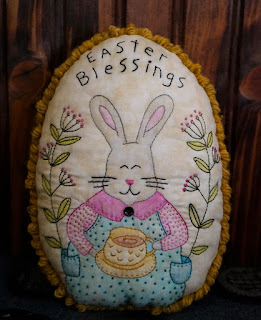
It seems like I have less time to do some things but more time to relax at night and work on projects. This week was a new stitchery by Kathy Schmitz. I got an idea to try something different and made an egg shape to put it on.

It was fun to make and I love how it came out. The egg is 9" tall so a nice size to display with my other Easter items. I used Gold Faber colored pencils to color it and thicker rug yarn for the edge.


I also had time to make up some Easter masks for the boys. I was hoping to find something more for boys, but Nick loves pretty colors and Alex doesn't care, so they will be fun to wear for the season.

Most of our time is spent at home for the doctors. Bill has surgery next week, so I am trying to organize my time so I have time for me and hopefully I will be able to get out by myself when the weather warms up. I do need my outdoor time and it won't be long before the birds come home from the south, so I can't wait to go back to areas where they nest.

I hope everyone has a wonderful weekend and is doing well.


Friday, January 22, 2021

Friday Finish and feathered friends!


This week I worked on finishing a new piece. I finished the stitching, but I still need to make it into a pillow, or maybe a wall hanging. I am not sure if I want to add a saying, it depends on what it looks like when I cut it down and add a border. The photo makes it look grainy but the colors are much brighter and smooth looking. I was trying to go for a pen and ink, with watercolor look.


We didn't do anything exciting last weekend. We rode around and realized we couldn't stop on the side of the road or down a back road with the trailer, so time to use the truck for exploring. We stopped at a bike path, but no parking so not sure how we can walk on it without parking, but we can park at the other end if we ride our bikes. I really wanted to explore a bit on the end, since that is the part that follows along the river.


I have had a lot of visitors this week, something to enjoy during the week. I think the young Downy Woodpeckers are the most fun. They are less afraid of me and they will hide behind the rails and peak out at me, but sometimes they are still enough to catch a shot of.


I also had a new visitor, a female Red Bellied Woodpecker. I had to shoot through the window, or she would take off. 


Today I was able to catch the male. He is a lot more skittish and it took three tries, just to shoot through the window. The minute he sees me move, he takes off, so I have to be sneaky.

You can see his belly in one photo, that is why they are called, Red Bellied Woodpeckers.


And a few others that I was able to capture. I used a different camera body with the zoom and in some ways, the photos are better, but it seems the camera has problems, so I may have to take it back for a fix. The focus wasn't always working and the menu wouldn't work sometimes, unless I shut off and on again. Luckily it is under warranty. It could be the lens, since I didn't have the problem with the other new lens. I guess I need to read my manuals, lol.


Friday, March 15, 2019

Friday Finish!

First I want to appologize to those who haven't gotten comments from me, on their blogs. For some reason I cannot post if I do the security questions, they just keep coming at me, so I just comment and it shows up as going through, but then I get returned mail, saying it didn't. So, I have been visiting and commenting, just need to figure out how to get mine to go through.

This week I had some tries that didn't work, projects I couldn't start and one project I got to finish. The design was offered by Homespun Whimsy on Facebook. She also has a block of the month with sheep, if you are interested in checking out Homespun Whimsy on Facebook.

I reduced the pattern by 20% and made a little pillow, that measures 9" x 6 1/2". I trace my design with a blue embroidery marker that washes off. Then I color in the design with colored pencils, then I stitch the design. This time I didn't use fabric medium but the color stayed when I wet patted around it to get the blue marks off.


And then there was the project I wanted to come out nice. I used Americana decoupage on this one and it bled more than the others. I also messed up on the sizing to fit the canvas. I really love the photo and saying, so I will have to try it in a different type of art piece.


And the project I couldn't get started. I was gifted the rolls of braiding wool and decided to make a scrappy rug for the kitchen. But, I cannot find my braid aids. I found 2 small ones and the box, but not the third one or the larger set of three. I am worried they went out with other items I gave away. I can braid without them, but I think it would be easier with them.

I will try braiding this weekend without them to see how I do. I have tons of scrap, rough wools so I am going to cut them into braid strips and make small rugs for entry ways and maybe some for the pet dishes. A good way to use up scrap stash that is not really good for hooking and it is more durable for those areas.


And then there is the total disaster. I decided it was time to shave Izzy. She will let me do it for so long, so I give her some canned food and she sits still for a few minutes. The problem was, I forgot to check the blade length so it shaved too close. Then she moved too much, so she is shaved mostly on the top and sides and looks like a lawnmower ran over her, lol. I think I need to get a pill to put her in a sleep state, then I could just get it done quickly and get her nails too.

I hope everyone has a nice weekend. We have good weather coming in, so I will definitely be outside as much as possible.


Friday, February 22, 2019

Friday Finishes!


This week I experimented with colored pencils and tools for blending. I had an extra design drawn up, for the bee skep by Kathy Schmitz. I thought it would be good to use on the crackle fabric, as my first try. The fabric says, 100% cotton, but it has a silky, stretchy feel to it.

I use freezer paper to trace the design and a blue washable marker. The paper keeps the fabric from stretching as I draw on the design. I also keep it on, while I color it in with the pencils. I use Faber Castell Gold Faber pencils. They come in a variety of colors and you can buy them individually at Hobby Lobby or Michaels. The best time to buy is when you have a 20% coupon, then you get that off, of each one.

I usually dull the pencil a bit, by rubbing it on paper, it leaves less marks if it is dull. You also want to color with a light hand, in circles, or you will see streaks, which I do have on some of my pieces. On this piece, I used a blending stump to blend the colors into the fabric and I do like how it works. It is made of compressed paper, so it is hard enough to rub the color and blend if you want some shading. The other benefits are, you can clean it with an emory board, and they are cheaper.

I do like how this one came out, the colors blended into the fabric nicely, though I may have used a bit of solvent at the end. The downside of this fabric is, I had a hard time getting the blue marker off, I had to rewet it quite a few times, to get it to disappear, which faded some color, so I had to recolor some areas.


On the second test, I made some little bunnies for the boys. I modified the bunny pattern from Kathy Schmitz to make it work for a boy and added a little pail with their initials on it.

I did get lazy and colored in lines, in some areas, which you can see on the pants. The bunny on the left was done with a solvent blender. It is double sided with a brush and a hard point. I used the brush, which releases a solvent as you go over the colors. It breaks down the pigments in the color and makes it more like water color. The downside is, it can bleed if you use too much, but it is not hard to control, once  you get used to it. It is also harder to add more color, once you use it.

The bunny on the right was done with the stump blender. I think I had more control shading, with the stump. As you can see, I was more concerned with making them, than the quality of my work.


I decided the bunnies were too light, so darkened them up and added things I forgot, then brushed fabric medium, over the colors. I wanted to make sure they could be cleaned. Unfortunately, I didn't realize I had brushed my hand onto the bottle of black stain and it go on the pants.

I really don't like the fabric medium, it gives it a stiffer appearance. The other test, the blue marker came off with a dab from a wet rag, so working on muslin, is better with markers, than on other fabrics. But, the crackle has a nicer look with the pencils, not sure if it is because I did a nicer job on coloring or because of the fabric differences, so I will have to try some more on the muslin and take my time.

I hope you all have a wonderful weekend!


Friday, February 1, 2019

Friday Finishes!


This week I am still experimenting with photo art and one type I tried is, attaching the photo, face side up. I had Bill cut out a piece of wood, but it is thicker than I would like to use. I like the thinner slat boards for art like this, but I wanted to test it first, before I do anything on good woods.

I like it in one way, but not sure if it is the thick wood, but not thrilled with how it looks. I think trying it on a white slate board, would look nicer for this technique. It is fun to try my photos in art, though.

With this one, I used decoupage to adhere it to the wood and then a coat, over the piece, then finished with a glaze medium. I also aged it a bit before I glazed it, with antique medium.


Another test was with a butterfly photo. I used the glaze medium this time and when I pressed the photo down, the colors started oozing out, so not the best medium to use. But, I was pleasantly surprised to see their was a nice print underneath.

I also used regular printer paper, which is thinner, so that may have left a better print but it was a pain to get off, the paper adhered with the glaze, so I had to be careful not to rub the design off. Overall it worked nicer than the first one with decoupage. I do think a heavier paper is nicer, so I will see if I have one without ridges. I will also try a heavy gloss gel medium, that I have. I have plenty of mediums, so fun to use what I have, to save money as I experiment. Most people seem to use the gel in this method, so hoping my heavy will work. I will also try the glaze with a heavier paper, I do like how it came out, overall.

As Michelle mentioned, most tutorials use laser printers, I am using ink jet, so you will get more color bleeding with that, but it lends to a more artistic look. I am also using cheap mini canvas squares, so not the best surface.


Another little project was a pillow I made, using a design by Ginger of Primitives by the Light of the Moon. It is a free design that she offers on her blog, along with others. I used my colored pencils and was not pleased with the look. I was trying to blend and make it look more like watercolor. I added some extra stitches, so I think that helped cover the flaws.

I did hear about using blending stumps, they look like fun to use and not expensive, so I will try those, on my next colored piece.

This design would be fun to do in punch needle too. I hope you all have a wonderful weekend!


Friday, January 25, 2019

Friday Finish and Freebie!


This week I was able to get a few projects done. I got some new colored pencils and wanted to try them out. I wanted to get the inktense, but they are expensive. I ended up getting Faber Castell's Goldfaber pencils. They are 1.49 a pencil, which is nice since you can choose the colors you want and not waste on colors like white or black. For black I prefer to use their ink markers.

The first piece I made was a design by Cheryl Seslar. I traced the design with a washable embroidery pen, then colored it in with the pencil. The material is a stiff white, that I got for punch needle, but it is too stiff and loosely woven. It was ok, but a bit scratchy for coloring on.

Once I finished that, I used fabric medium and a bristle brush to move the colors around. When wet, they do blend in, so nice for more detailed projects when you want to add shading and mix colors. This was a practice piece, so I kept it simple.

It was too white for my tastes, so I used antique medium afterwards and there was no bleeding of the colors.


The second piece is a free design by Lori Brechlin. I really loved this one, the fabric was darker and softer, so the pencils colored more smoothly. I will have to try different fabrics and techniques, in future projects.


Here are two pieces that I used to try their colorfastness on. The flower was done with a fabric medium, the heart was just colored, so medium used. Once dry, I washed them in dish soap and scrubbed a little, then let dry. As you can see, no color bled out, so either way will work.

This was done with the bad weavers cloth, so you don't get the nicer look that you do on cotton.


Since I love making things from freebies, I decided to make one of my own. I found this saying and it was perfect for Valentines day. I did use the cheap fabric on this too, a good way to use it up. For the stitching I used black #12 pearl cotton. It is a fun and simple project you can do over the weekend.


I hand wrote the saying, so you could do one of your own. It is not exactly like mine, I tend to change things as I go. With primitive stitchery, you want your letters to be a little wonky. I did forget when I was recopying the e's on the third line, so just remember to pull the end down more. You can stitch t he hearts, do appliqué or use buttons, as well. 


And as an added bonus, I found a template online and added the saying inside. You can change it around if you want or add something to the empty spaces, but I wanted to give you one with the shape, that you can use to print out and have fun one.

I hope you all have a wonderful weekend!