Showing posts with label thread. Show all posts

Friday, May 4, 2018

Friday Finish!


A new month, means a new stitchery from Kathy's, One Stitch at a Time Club. I always enjoy getting a new pattern and they always work up quickly. She gives the option of using just floss or coloring in your piece with instructions on her method.

I thought I would try it this time, I used cheap pencils, which was not the best idea. They work, but you don't get the nice colors that art pencils, will give. I added some lavender and put it in my sewing room, with the fabric on a shelf. It really helps to keep things fresh smelling. Instead of stitching the buttons, I decided to use real ones.


I also tried a simple project for glass. I used a 4" canvas and tried to paint it to look like beach wood, but it just doesn't have the same look as real wood. I want to put a wave of glass in the heart, but my tiny pieces are not fitting that well. What seemed small to me, is not when you do it in this scale. I guess I will have to hit the beach and do a sand search for tiny pieces. There is tons of it on the beaches, so I will gather some for this piece.

I also used crackle, not the best looking piece and I think on wood this would look nice. I just set the glass down to give you an idea of what I am doing. You can see by the drawing, the wave needs more sweep, than I could get with the glass.

I hope you all have a wonderful weekend. We have one good day, so I plan on enjoying being outside.


Friday, July 22, 2016

Friday Stitcheries!


This week I worked on two stitcheries by Kathy Schmitz. One will be a gift and one is for me.

The stitch piece is from Kathy's One Stitch at a Time Club. You can still sign up and for 2.00 a month, you get a stitchery each month. A fun project to look forward to each month. It is a needle case. The birdhouse is a hanger which I will use as a welcome on the peg rack and leave open so I can fill it with scented berries. The stitchery can be found on Kathy's Blog as a freebie, make one for yourself and it would make a wonderful gift for friends.

I hope you all have a wonderful weekend.


Monday, June 1, 2015

Weekend Finishes from Freebies!


This weekend I was able to get the new Wool blocks put together and done. I missed last month, so I did both and it was fun to do them and two more blocks towards a finished quilt. The block is offered by Stacy of Buttermilk Basin for our Facebook Wool Applique group.

Last month was the sewing block and this month was the kitty block. I think the kitty one would be fun to do as a wall hanging too.


I also did the ornament for last month, tonight there will be a new one, so can't wait to see what this one will be. I messed up on the bird placement, but I do like how I used a blue background on this one. They are going to look nice hanging on a swag line, next Christmas. This free ornament is offered each month by Trish of Attic Heirlooms.


Friday, June 6, 2014

Friday Finishes and Winners!


This week I actually finished two pieces. The first is a stitchery by Woodberry Designs. You can still visit her page and download the stitchery if you would like one.

My sister redid a room in her apartment with a garden theme, so I thought this would be a nice piece for her new room. I like the saying and it is garden and sewing, so something from me to her since she lives far away.

The original is done in red work, but I liked the idea of using some basic colors on my piece.


The second piece was something quick and easy. I wanted to make a mini americana quilt for my bunny, just for fun. I used up scraps in this piece and hand stitched it with black pearl cotton. I sprayed watered down walnut stain on it, when it was done.


And now for the giveaway winners! The correct answer was B, the story goes that the couple were not allowed to get married so they eloped and paddled away in a canoe. They paddled into the ocean, and when they saw the river, they paddled up and landed at the fresh water brook. The local indians befriended them and eventually they built a home and farm in the same area.

Donna G. gave the correct answer so she is the winner of one epattern and the random number generator picked #11, which is Julie Fukuda. Ladies please email me with the pattern of your choice from my ecrater site.

I hope everyone has a wonderful weekend!

Saturday, September 14, 2013

Pumpkin Punch Finished!


Last week I started a punch needle piece for fall and today I finished it. I had to work two days straight, but I got it done. I also got all of the applique done on my wall quilt, now I can quilt it and finish it.

The pumpkin is a pattern by Brenda Gervais called Boo and Jack. It was a lot of punching, the finished size is 7" long and I am a tight puncher. I used DMC for the main colors and valdani for the kitty. I love their black shades. To get the multiple colors, I just grab similar colors and punch in random patterns around the pumpkin. I have a collection of tree branches that I save for projects like this, so I used that instead of a pumpkin top.

I hope you enjoy my newest piece and everyone has a wonderful weekend.


Tuesday, January 29, 2013

Primitive Pillows from Free Graphics!


A while ago, I had bought some Inkjet fabric sheets and decided it was time to try them.
I didn't know what I had bought, it says, sew in sheets, so I think I got the wrong type and wasn't sure if they would work.

The sheets are a bit stiff but that makes them nice for printing. They do print out nice and clear and the colors really come out nice. After you print them, you let them sit to dry the ink, then heat set them with an iron. I waited a day and then ran them under cold water, which sets the colors. The only thing was, the red shades did run, but as you can see by the photos, antiquing them, took the hue away.

This design I printed out, about a year ago and I think I got it from a free postcard site.


I found this alphabet print at The Graphics Fairy, loved these two the most and had to make them into pillows. Love the old time look to them.


The last two are also from The Graphics Fairy. I printed out too large, but they still make nice pillows to add to a spring or Easter setting. If you visit The Graphics Fairy, you can find a lot of wonderful designs to print for pillows or altered art pieces, lots of possibilities.

I really had fun making these and was so glad when they came out so nicely. Next time I will try the regular fabric sheets to see how those work.


Wednesday, October 17, 2012

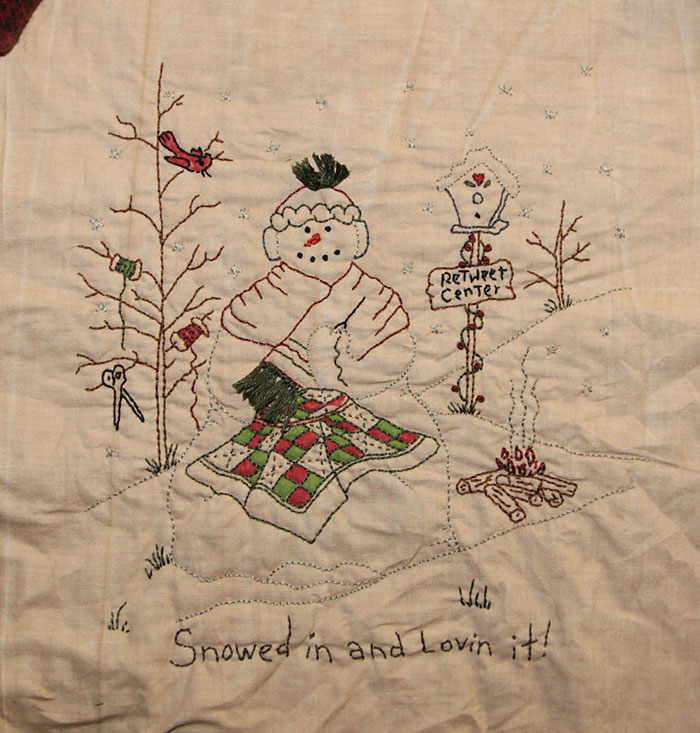
Snowed In!


I bet  you expected a photo of a snow storm, lol. We did get an earthquake yesterday, that was my first experience with one. It started in Maine, but travelled all the way to RI and it shook the house.

Last month I won some free patterns from This-n-That Fabrics. Today I finally finished the stitching on one, it is called, Snowed In, Lovin' It, by Chickadee Hollow Designs. I thought it would make a nice gift for someone who likes to quilt. I used fabric markers for the colors, as it was done in the pattern.I think the extra color adds a fun touch and gives it some pop. I didn't add hair to her head, and I didn't read how to do the scarf and hat, I just hand knotted pieces to the spots and it didn't come out too bad.

If you haven't signed up to follow This-N-That Fabric's Blog, you should, they have lots of fun contests and right now they are still taking votes for the Awesome Autumn Challenge.

Now I have to figure out how I want to finish this piece. The original is in a frame and I like that idea, or I might make it into a mini quilt. I added a piece of batting before I stitched it to give it a more sculpted look, and it is a great way to hide the stitches.


Tuesday, July 26, 2011

Antique Pin Keep!

I finished my pin keep, and then I went to take pictures. The moment I turned on my camera, it started making a funny motor sound and it wouldn't let me take a photo. Everything else works, but not photo taking, errr. I was cleaning it before hand, so I thought I might have done something to it, then I remembered our kayak trip. Bringing back my gear, I was swarmed by mosquitos and I dropped my gear to grab the bug spray. What I didn't think was, I had my camera case too and that got thrown to the ground, duh. So maybe I broke something. I am getting a nice new one next month, but I can't go without a camera that long, lol. I have an old sony, so today I figured out how to use it again and too some photos with it. At least it works and I can work on my settings to try and get better photos, but for now, you will have to put up with grainy photos. This was on night shot, it was the only way I could get it at night and still be able to see it.

The original idea came from an antique pen wipe, the hearts and hands. I loved the old look and wanted to reproduce it.


Then I decided it needed more items, so I added inner pockets. This is going to be a gift, so I sewed on the wool floss applique, at the tops only and left the middle section open, then I wound the real floss around them. This way she will have some hand dyed floss to use and she can store some of hers, that way too. The floss is a lot nicer looking than the picture.


For the other side, I went with a long pocket, so it can be used for skeins or whatever she wants to put in there. I will be adding some goodies to it later, before I send it out.


I added a strip to the outer, middle edge to give it support and a button closure, with a little extra room for when it is full of goodies. I made an applique on the outside and wondering if I should add her name to it too. I hope you like it and wish I could show the true prim look, it has been antiqued with walnut, as well. Tomorrow I will have to see if I can get better photos outside.

Wednesday, February 16, 2011

More Eggs!

I am on an egg craze, lol.
It is fun experimenting and trying different types and inspiration for all of you, to try your own.

I went fabric shopping and found some cheater fabric, so of course I had to get some, to try some quilted eggs.
I cut out the egg shapes and using a piece of batting behind them, quilted them with black pearl cotton.
Then I sewed them together and stained them. Great way to make quick eggs to fill a basket.

I need to watch how I sew my tops to keep them more rounded and next time I will try two pieces of batting to get it to look more quilted.


And this egg took me a while. I used fabric and artist markers to color in the design first. Then I outlined it with black and did a little fun stitching. I can get a little shading and blending with the markers, but I might try painting the next ones with acrylic. If you would like to make your own egg, you can find the design at Mary Corbet's.

I did not use anything to trace the design on this one. I taped the design on my light box, then I taped the fabric over that. Then I colored in the design, so I could just outline it with the black, afterwards. I did antique it with walnut ink, but the flash washes away the antique look.


And last but not least, I made a couple more scrappy eggs to add to my other basket. I asked Moki to hold them for me, so I could get a picture, that was a mistake;)

Monday, November 1, 2010

Finished Hexagons!

Today I decided to finish my hexagon quilt.
I added ties to the middle of each flower and a couple of reddish orange tacks on some blacks.
It needed more than that, and I didn't want to cover it with ties, so I went with machine stitching in the inner and outer border area. To bind it, I cut off the excess backing and batting to 1 1/2" from the outer seam line.
I fold the black over the backing and then fold that in half to give it a smooth look on the back.
I was not trying to be perfect with this quilt, since I made it for fun and to try out hexagons.
It will make a nice lap quilt though.

As you can see Izzy is the first to try it out. She is happy that Moki is no longer using the office, she likes to sit on the chaise, when I am in here. For the backing I used the fabric that is in some hexagons and it has most of the shades in the flowers. I found that at a thrift store.


Here it is laid out. I think it might be a good piece to leave in my room for when I am sitting and working on designs, this winter. I used two layers of batting to make it warm.

Tuesday, October 26, 2010

Hexagon Borders

Today I got the borders done on my hexagons.
I decided to just trim off the edges and even it out.
Then I took the scraps from the flowers and pieced them together to form the first border.
Then I took black and put that around for the edging.
After I get the ties done, I will take about an inch of the black and fold it around to the backing, for my binding.

On the Moki front, he came for breakfast today and then wandered off. I think he had a rough night, he looked thinner and was really skittish.

Tuesday, September 28, 2010

Cats and Hexes

Since sitting is the only activity I seem to be able to do, hand stitching is the best project to keep my hands busy.
I should know better, stretch before and after activity;)

I made this piece a few months ago and decided to bind it for now. I wanted to do quilting on the border, but not sure.
Should I add quilting to the border or leave it alone? The piece was painted with acrylics after I stitched it. I wanted to try a different material, I think the background is a cotton mix. I prefer 100% cotton, it takes the paint better. With this, the paint sat on top of the fabric, so it is stiffer feeling.

The pattern is from a Red Brolly, free design. She has wonderful kitties in this series. Great ideas for gift giving to friends. She has a fun christmas kitty for the newest freebie.


I spent the last two days, sewing hexagons and think I will stop at this point. I just wanted a lap quilt and with the borders, it should be the perfect size. My plan is to use the homespun scraps from the flowers, to do little triangles around the edge. The problem is what to do with the top and bottom, they don't line up the same way as the sides, so I will have to think on how I will go around with the colors. After I add a border color, then I will use black for the edge and binding. Instead of quilting, I am thinking of putting ties in the middle of each flower.

I also decided that I want to do up a few extra chicken designs to go with my last piece. I will probably punch one and offer only a design with the other, but I will work on those this week, so you will get three patterns instead of one.

Monday, August 30, 2010

Mindless sewing!

I was in a mood today, couldn't get into anything creative.
Yesterday we opened our tent trailer and discovered that mice have been living in there and found a dead one, ick.
So, no camping this year. I will have to sanitize all the surfaces and anything not attached gets thrown out and replaced.
We do need a new canvas, so we will wait till next spring and replace everything then.

Today, I putted around the house and then decided to play with my scraps and try some hexagons.
I found the template online and using freezer paper, traced them onto that and cut them by hand.
I found the templates at Moxy Ideas. You can find the downloads on the right side and you can get different sizes; I used 1.5. ( If I had a Go cutter, it would have been easier;)

I sewed them by hand and they didn't come out too bad. I just tried to match up my points and eyeballed the 1/4 sewing mark, which I am sure I was off on, lol. This is a good project to use up your scraps and sew them until you have enough for a quilt. Now, how to make them into a quilt so they square off, I have no idea, guess I need to find a pattern. I am sure I have a pattern for them in one of my books. I was just too lazy to look through them.

The pink ones was my first try. I was using some of my prim scraps. The second ones are from my, too bright and fun pile, so maybe I will go with that theme, with dots and floral dot types.

Monday, August 16, 2010

Hanging small stitcheries

" First of all, I want to mention..... no comments on my last post? Are you all chicken, lol. I put those up to show you the works in progress and that is why I usually do no show them. They need work and fixing, but I thought you might like to see how a piece evolves. I am still working on the rug, a few changes sure make a difference. Now I am working on how to get the cat's whiskers, the way I want. So do not be afraid to comment, good or bad, I love feedback and opinions."

I finished this piece yesterday and wanted to show you a new way, I found to hang my smaller pieces.
My husband got me this tape for the new stair treads, but it wasn't the right type. But, I found it holds onto fabrics and walls, without damaging either.

I am not sure what it is called, or the brand, but there is writing on the tape, so you can look for that in the stores. I cut small pieces, leaving the paper on. If you don't, it sticks to you and balls up. Once you have them placed, you can take off the tape, by using your fingernail on a corner and pulling up.


Then all you have to do is, position it on the wall and press. It is a wonderful way to hang without anything showing and great for small areas. The stitchery was done with a design from Primitive Blessings. I am taking this saying to heart and slowing down on all of the crafts I do. I would like to spend more time working with quilting and making art quilts too.


The tape will work on other items too and it is a great way to place things that you may want to change. I have this candle holder and was thinking how fun it would be to put a punched piece and change them out for the seasons. With the tape you can. But..... if you mount this way, make sure the piece has a backing on it. You do not want to put the tape onto the punching or it will pull out the loops. ( I thought it was safe to do for a demonstration, since I was taking it off right away, but the tape is strong enough to pull them out;) This piece is a pattern from Brenda Gervais, that my friend Kelley sent me. I plan on mounting it on something for my sewing room. I just haven't decided yet.

I will be making more small quilts for myself and I love using this to hang them. It is a great product and easy to use, and no mess. It is also nice, since it doesn't damage the quilt or leave marks, in case you want to gift it in the future. I am working on a matching mini pillow using new wash away pens, so once I am done, I will let you know how they work out.

Thursday, April 29, 2010

Portrait Progress

I have been working on my portait and have most of it done.
Now I need to fix the crooked mouth and weird eyebrow, lol.
This is what happens when you sew, while watching tv;)

The hair is done with yarn, lopi lite. I still have plans to style it a bit and give it some more strands after everything else is finished. I am thinking of ways to shade the face, maybe painting in shadows and highlights. The bowtie needs to be tied, I have no idea how to tie one, so going to look that up. I will also tack down the pleats, so they drape better. Luckily, with hand stitching, I can change things without too much trouble. It is not what I envisioned, but a good learning experience and it is fun to do.

Don't forget to comment on the contest and the pattern sale, which runs until sunday.

Sunday, April 25, 2010

Quilt Show: Part Two

Here are the rest of the show pictures, that I took.
There were lots of quilts, but these were the ones that stood out for me.
Unfortunately, the true colors do not show here, but they were stunning in person.

These quilts had nice applique patterns and fabrics.


These I like because of the edgings and ways to use scraps.


Who doesn't like an americana quilt.


And this is just a fun quilt. I have seen another done in more prim fabrics and I really like the pattern that way.
I think it would look great in homespuns too.
I hoped you enjoyed the show. It is always fun to go to local shows, wonderful people and lots of inspiration.

Wednesday, April 21, 2010

Stairway to Quilting

I received my new stair treads this week and put them on the stairs to see how they look.
Of course the picture cannot show how nice and prim they really are, but I love them.
I found them on ebay from a seller called littlegranny. She has great prices and is willing to discount on full sets.
We still need to finish off the edges and I am thinking of sanding down the shiny paint my husband put on;)
Then I might do a simple stencil on each riser. And the guy making funny faces is Casey, he does that when I talk to him.


I finally decided to go with yarn for my hair and using my needle felting tool, I punched it into a wool template. Truthfully, this is what my hair really looks like, now, lol. Later when I finish the rest, I can go back and redo it, here and there, if I want. I do have a new couching foot, but I need to practice with it some more, then I can try hair with that. I made a tie and sewed it in, later I will figure out how to make a western tie and do it that way. I thought it would be fun to have a 3D effect on that. The picture is out of perspective since I have it one curved couch. The yarn looks mooshed since I had to use flash and I move too much.

Tuesday, April 20, 2010

The real me!

I started work on my portrait quilt and got a little started. I tend to think a lot and change my mind a lot and after hours of that and replacing things a million times, I am worn out;) So, it is a long process for me to create something. I am just going to have fun with this one and have been mulling ideas of ways to do the hair and the tie to make it fun.

This is the beginning, I used brown wool for the hat. I messed up with the sizing on the band and brim, so need to redo it to fit right. I am using light and dark tea stained fabrics for the skin tones. It may not look like me, but using wool and making it easier, is easier on my hands. They seem to be a bit numb these days, so I am working on this and some cross stitch, to give my tendons a break.


I added a little to the body. I love the old shirting my friend kelley gave me, works perfect for this. the vest is a dark red wool. This is thrift wool, 20% nylon that really felts up nice for appliques like this. Today I will add the rest and glue down the edges on the shirt and try to wrap my brain around, what gets sewed first, lol. If you would like to join in on the challenge, check out Say Cheese, and see what others have done.

Sunday, April 18, 2010

Little Quilts

I finished two of the little quilts I am working on.
The first is 8" x 7". The design is by Twigs n Sprigs and I added the lettering to that.
After I did the stitchery, I painted in the design with watered down acrylics. Then I heat set it in the dryer, washed it with soapy water and redried it and the paint did not run or fade out.

This is the piece after I finished.


This is the piece, after I antiqued it. The painted areas look more faded than they appear in the photo. I also think, I could do a light sanding in some areas to get the antique medium to take on the paint.


This piece is one I decided to whip together and you can tell, I did, by the lopsided triangles, lol. I had a bunch of little squares, so I sewed some together to cut triangles from and put them all together. I just wanted something quick and prim. It is 13" x 10". I started working on the annie, so that will be done next. I started to paint the cat stitchery, but used too much water and I had to rinse it out to avoid more run off. I will work on that when my brain can handle painting again.

Friday, May 15, 2009

Kitty Pin Cushions

I am still working on my braided runner, but I think one more round should do it. It is not wide, but the length is what takes time going around. Once I finish that, I can go back to my large hooked runner and finish that.

I made up a some more Kitty pincushions from Rock River Stitches.
They are fun to make and work up quick. I think they will make great gifts to send for fun.

I am experimenting with different materials to see what I like best.
This one I did in black material for the kitty and a homespun for the base. I like working with homespun, it is soft and easy to handle. This one is my favorite, so far. The picture does not do it justice. I had extra room, so I put two spools on it.


The second one I did in ticking for the base and the kitty is made of wool. Wool is definitely easier to work with, and it hides a multiple of mistakes;) I really need to pay attention to my sewing, to keep the circles in shape, but mine end up a bit off here and there. I took some yarn and made a little ball out of it, love the look. I will make more when I get a chance and try different types of wool too.