Showing posts with label machine quilting. Show all posts

Thursday, August 30, 2012

New and Improved Charity Quilt!


I played with lots of different fabrics to add a border and still keep the fun look, but nothing was working. I found the perfect black with red flowers, but of course it was old stash and not enough. So, I went with the tried and true black and red homespun. This is a heavier weight, so perfect for this quilt. I like how the black frames it but it was too plain and I remembered the black spool of ric rac that I bought. It was perfect, it gave it a fun touch and bought it all together. The photo makes the middle pop and the border got too dark, but in person it looks nice together, at least I think so.

I noticed I didn't get many comments, don't be afraid to voice your opinions.  Do you think the new version is better or am I just off my rocker? LOL

If you would like to know more about the quilt drive, visit Rosemary's blog. It is a nice way for beginner quilters to get into charity quilts, especially for those of us who are quilting challenged.


Thursday, August 23, 2012

A New Eyeglass Case!


Today I wanted to make an eyeglass case. I was thinking of punching one, but nothing was inspiring me. Then I thought about doing a fusible art piece, but couldn't come up with an idea that I liked or the gumption to think of something;) So, I decided to use fabric that I won from Barbara of Cat Patches. On fridays she has a giveaway and she sends a surprise fat quarter and I was the lucky recipient of this fun cat fabric. I used some to make an iPad case and today I decided it would be perfect for an eyeglass case.

The first attempt was a disaster. I was using free motion and got carried away and broke the needle, so started over. This time, I took it slower and outlined the blocks and the designs, not perfectly but it was good practice to try and follow them with free motion quilting. I realized after I did that, that I should have closed the top first and then realized I should have sewn the backing on first to get a nice finished edge and then used a blanket stitch to attach the wool back, like I did with the punch needle case. Not the best looking case, but it will suffice for now and it keeps my glasses safe from getting broken.

Here is an example of, what not to do;)


Saturday, June 30, 2012

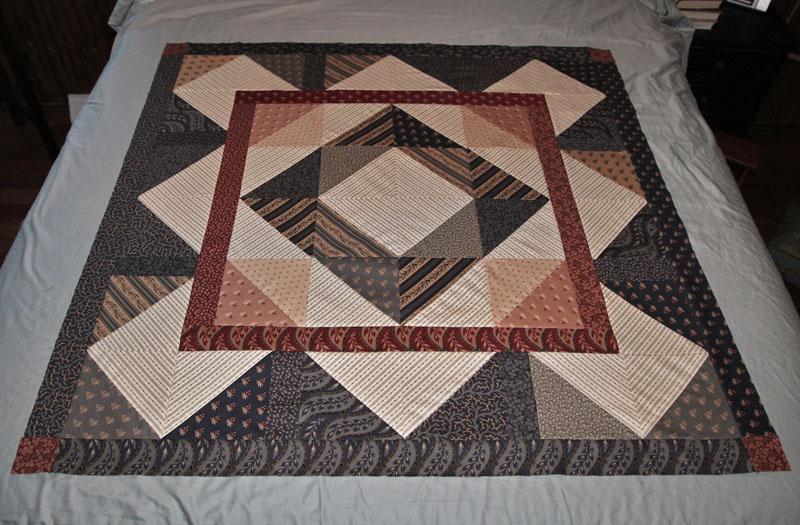
Finished Quilt Top!


I can't believe I actually finished something, lol. I am starting to get back my motivation and working on finishing what I start and it is a good feeling. Of course the idea of quilting it, is overwhelming, but I have decided to look at it, as a section at a time, starting with the middle and working out. That way I can decide on the design I want to use for each part and fit the design to the patterns and shapes. At least that is the plan, I may get crazy and make a mess;)

I hope those who are in the paths of the storms and fires, stay safe and my prayers are with you all.

I went with a hit and miss border, then a dark red cloth, that my friend Kelley gave me for amish quilts. It is a nice weight but softer to the touch, so nice for a border and my binding. The main fabrics are from the 1862 Battle Hymn collection, by Barbara Brackman.

This makes it look like the border is thin, but I couldn't wait till it got darker, since I would have had to use a flash and I wanted to try an outdoor shot. I am not sure if I like the brighter white shirtings, I might have to soak it in tea after I quilt it?

My bad editing made the red look more purple, but is a really dark red, so goes nicely against the other red shades.


Friday, June 15, 2012

Civil War Quilt Progress!


I worked some more on my quilt and I like how it came out.
I wanted to use the blocks that I cut out, but in a unique way, so I played around and came up with this design. I added the red border, without thought to size, so of course the blocks wouldn't fit evenly around it, so I added an extra blue piece, in-between. Once I got that on, I added another row of blue, with red in the corners. This is the result.


This is how it looks and fits on my bed. Now I have to decide on the outer borders, using the jelly roll. Maybe some keys going around, will think on it. I may add some appliqué in the center and I may do some free motion designs, will think on it;) The fabric is from Barbara Brackman's 1862 Battle Hymn line. The shirting is from Judy Rothermel fabrics.


Saturday, April 21, 2012

Narragansett Bay Quilter's Show: Part One!


Today we went to the quilt show and I made a video of the show, but the quality is horrid and the photos are too small to really see the quilts, so I will show a set at a time. I wasn't as impressed with this show, as I was with previous ones, but there were a lot of beautiful quilts and inspiration. I didn't buy anything, but Bill bought a bunch of tickets for the Basket raffles. He filled them out, then gave them to me, to put in the ones that I liked the most, so heres hoping I win one, though I won't count on it, lol. I hope you enjoy the quilts.

I loved the use of shirting in this one.


This one is a basic nine patch, but made special, by the fussy cutting of the squares.


A fun quilt with a lot of piecing and wonderful use of fabrics.


Beautiful colors and designs


An interesting take on americana and nine patch


This is just fun


I really like this, unique piece of art in fabric


Truly gores, beautiful appliqué and quilting


A nice folk piece


What is so wonderful about this piece? It is a mini quilt, so much detail in such small spaces.


And the last one for tonight. This is a unique piece, love the idea of using a seed package as a design


Monday, September 19, 2011

Mini Tumbler Quilt!

I wasn't up to doing too much yesterday, so I grabbed my box of scraps and made myself a little tumbler quilt. I found a template online and used the inside dimensions of the 2", then added the quarter inch to make it smaller. I was looking for a one inch tumbler, but didn't see any. I sewed the pieces by hand, but decided to sew the rows by machine;) Also the border was machine sewed, but the rest I hand stitched with floss. It is a fun project to do and I think it would be fun to do in Christmas colors too. Great way to use up those scraps and great gift idea for friends. I do have a Go tumbler die and plan on making a large one for myself.

This piece measures a little over 11" x 8". I also stained it with walnut spray, after it was finished.


Friday, June 17, 2011

Braided Quilt

I have been working on my braids and today I put the rows together, so I could see how it looked on the bed.
Not really thrilled with the design for my bedroom and it does match the couch nicely, so I am going to stop and keep it this size for the couch and that way it will be a nice throw if anyone has a sick day.

Next I will add a border around the outer edges and quilt it. Not sure how I should quilt it, any suggestions are appreciated.
I seriously need a new bedroom set, the bed is wobbly and i want a simple one with no foot board and my bureaus are the first ones we ever bought and falling apart.


One problem with making the braid with chisels is, my die seems to be off. Seems every die I get, has a problem, so I wrote accuquilt, but no reply yet. Maybe they are sick of hearing from me, lol. Can I help it if I have bad luck or the company I get them from, seems to get all the bad ones? I use my free rewards to get them, so it goes through amazon and depends on who has the best price.

You can see by the ruler, how the flat end, is cutting strangely.


And here is what some look like when I sew them together. It made it hard to sew them properly, since that edge was throwing me off. If I had to stop and cut each one as I went, it would have taken me forever. I did enjoy using the chisel die though, it went fast and made it a lot quicker to make a quilt. I think I might buy a cheap spread for the summer and then I can take my time and make a nice quilt for my bedroom. I would love to do an amish style with fancy quilting.

Thursday, May 19, 2011

Sea Bird Quilt!

I started a piece last night, but it was late and i was tired, so decided to finish it today.
I joined a flicker group that is making quilted pieces from Charley Harper designs.
They are wonderful designs and great practice for art quilts and machine quilting.
I started with the machine, then I added hand stitches and decided it would look good with walnut stain.


I still have a lot to learn with machine quilting, but it is fun practicing and I really like how this one came out.
I decided to antique it and hang it in my bathroom, since I have a mermaid theme and a few sea items will go nicely in there.
It is the perfect size for a small area next to the bureau.

I still don't know how I will edge my quilt, first I will do the panels and lay it on the bed, then I can decide what to do next.

Wednesday, May 18, 2011

Quilting and Dying!

Today I did a little of this and that.
I started a new quilt for my bed, a braid using the Accuquilt Go Chisel die.
These are my first three strips, of two color variations and a third will go in the mix.
My bed is high, so I am thinking about using a black ruffle for the outer side edges, what do you think?


I found a package of rolled felt that I bought years ago. It was yellowing from sitting so long, so I washed it out and threw into a dye pot. I used; brown, black, green, tan and yellow rit dye to make a mud bath;) The felt was pure white, so now it is aged tan. It is tablecloth size, so I might do applique on it with felt and make a holiday table cloth with it. The water was still dripping from the bottom, the original color was brown, but it dripped out and left a nice tan cast.


Since I had more mud bath left, I threw in some old wool yardage. I bought this from a store that sells, by the pound, so not sure if it was 100% wool. One took the dye and gave it a nice mottled look, the other got a little darker, so at least they are not brights anymore. They will be good for quilting projects, they have a nice soft loft.

Monday, May 16, 2011

New Welcome Quilt!

I finished my quilt yesterday and today I antiqued it, so all done.
I made this one to go at my entryway, to replace my bird piece.
I cropped the quilt, since I stuck it up quick for a photo, it looks distorted;)

This quilt is a design by Cheri Saffiote for the new magazine, Primitive Quilts and Projects Magazine. I decided to do this one first since it was perfect to put on the wall for the spring and summer season. This is one magazine that I didn't say, I will make this one day, I want to make a few now, lots of wonderful projects. Cheri does a lot of wonderful primitive patterns, so if you have never seen her patterns, visit Quilts by Cheri and you won't be disappointed.

Today I started a new quilt, a new one for my bed. I did not make my last one, large enough, so hoping this will fit better.
I am attempting a braided design, so once I get a few rows done, I will show you my progress.

As for my last posting.... I was a writer for a while, I wrote a weekly column for kid's science and medicine. I also wrote trivia questions for an educational site, a game site and a review for a Mac gaming site. I haven't written in ages, except for my blog, so I have gotten lazy with my writing;) There is always beach glass, but mostly from kids and people who don't care about our environment, not enough wave action on the bay to get smooth glass, unless it has been laying there for years.

Friday, May 13, 2011

A little bit Country, a little bit Rock N Roll!

I finished one piece last night, but with Blogger down, I had time to finish another, so I can show both tonight.
The first is a primitive doll by Tiffany of Primitive Blessings. I made this a year ago to go with a friends crib, but never finished it, so I finally got it done. I wasn't sure what to add to it, so I just put some basic stitcheries and antique it. I love to add names from my family history, Loper is one of those names.


And for all you lovers of bright and crazy, here is my hippie piece. To recap the story, the first time I met my husband, was when he drove a few of us to Boston, to see Aerosmith. I had a boyfriend at the time, but the minute I met Bill, there was a connection that we had. I had to add a kitty and dog to my world and the words are two songs from their first album. I did free motion on the background, using the swirls are a guide and the outer edge has a machine, feather stitch.

Monday, May 2, 2011

Doggy Pillow!

Since I made the dog piece to practice my machine stitching, I decide not to go crazy with it.
I thought it might make a nice pillow for Casey, so I added a saying and his name and his favorite things, a bone and lots of balls.
I used stuffing from an old pillow, so it is a bit lumpy, but I don't think he cares;)
If you would like to make your own dog piece or something to donate to your local shelter, you can get the pattern at Angie's Bits 'n pieces. You can find it under the free patterns.


And here he is, giving me his grin of approval.