Showing posts with label free pattern. Show all posts

Friday, March 31, 2023

Friday Finish!


 I hope everyone had a good week and was able to create and enjoy some good weather. I know so many areas are getting hit with tornados and snow still. We have rain and nice days, on and off, so I try to get out when I can and create when I can.

This week I am still working on my needle felting piece. It seems the easier a project, the harder it is for me. I decided to take a break and try some fun eggs to use at Easter. I just made two to try it, so I will make more so everyone has one to place their cup on. It is a fun and fast project and a great way to decorate the table.

Great way to use up scraps. You can find the free pattern here: American Quilting and Patchwork.


Being able to get out, has started to make me feel better. I enjoy being outside and the walking is helping to build up my strength. Last weekend we stopped at a preserve and enjoyed a walk and bird watching. There is also a farm to the side and I love to see the ponies.
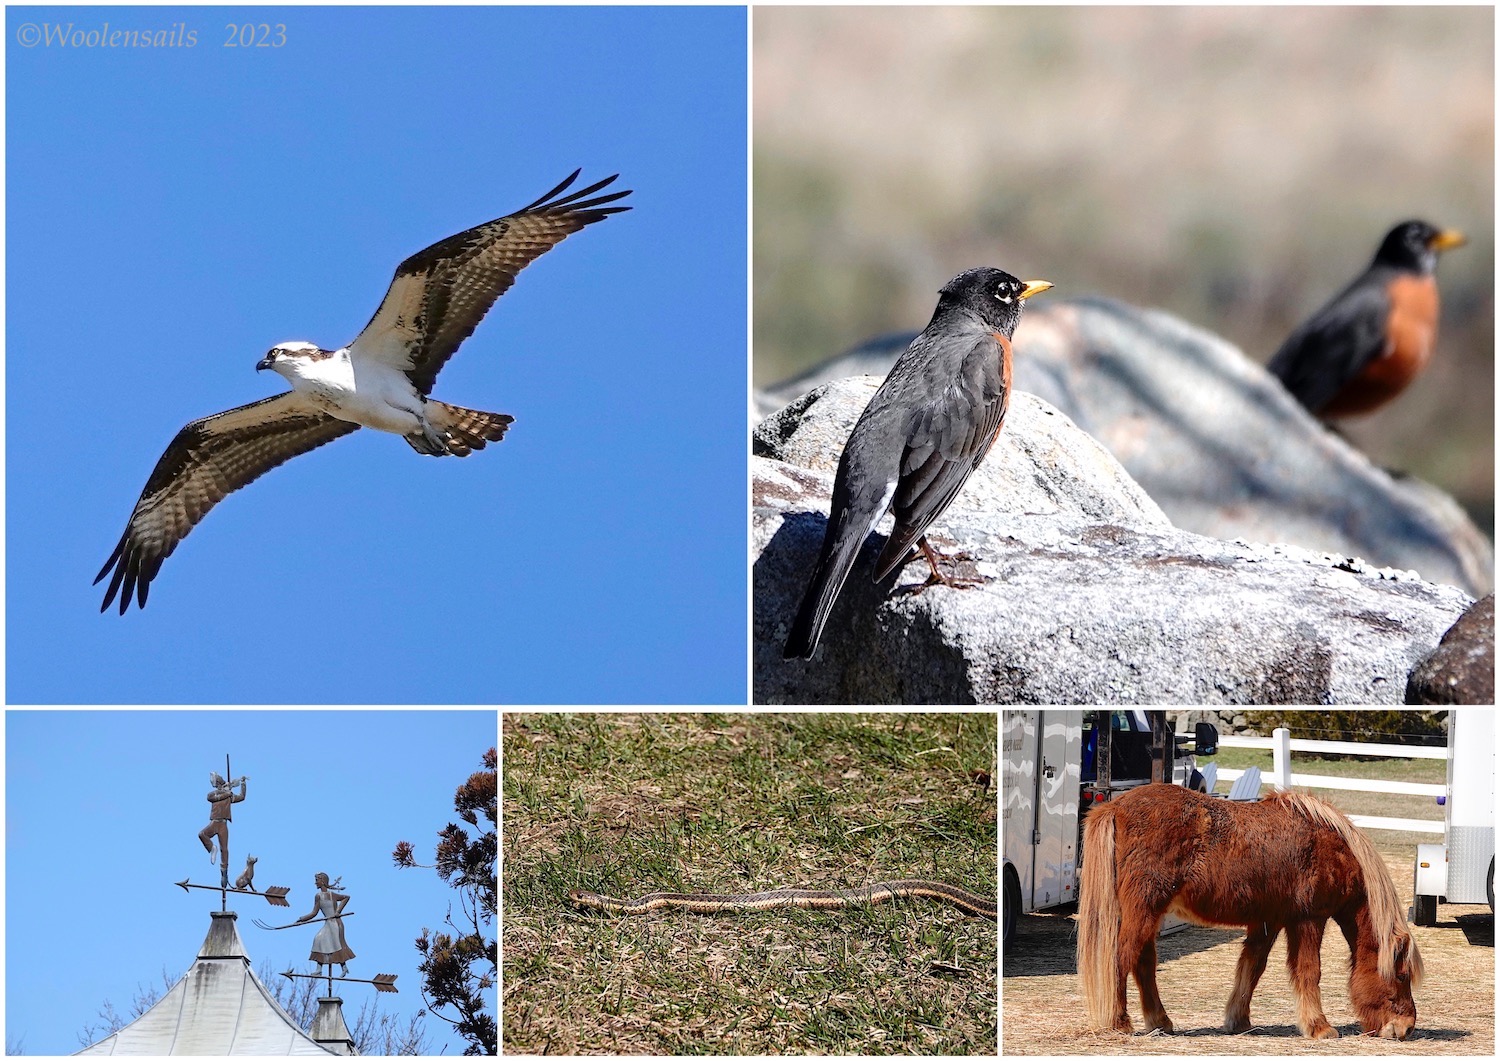


We also stopped at the ocean and enjoyed watching the waves and spotted another nesting Osprey.


During the weekday, we went to another preserve and walked to the coast, and spotted a couple of seals on the rocks. The tide was higher, so we missed seeing more, since it was later in the day.


Another day we walked along the bike path and into the wooded area, to the bay. We spotted more birds and another Osprey heading back to the nest.


Today we went to the island for some beach combing, not much to find since the tide was coming back in. We did spot more Ospreys, this one was at the park we visit. Also, a couple of gulls sitting on the big rock, in the bay.


Near the park is a farm and another nest was being readied by its occupants. Another Osprey was trying to get into the nest so this one decided to sit it out, while the other two battled it out. I think one was trying to steal the sticks, maybe the one from the first nest. The first nest is usually huge, but the winds blew most of it away, so they have to rebuild.

I hope everyone has a nice weekend and get a chance to get out and explore. With everything that is going on in the world, finding peace in nature, is the best way to unwind and find a balance.


Friday, October 21, 2022

Friday Finish!


This week I finally got the binding on one of my wheel chair quilts. I watched a video, about 10 times and still messed it up, lol. I think I need to watch more videos so I can do the edges better, but it still came out nicely and hopefully the recipient will enjoy it. The colors are a bit bold on some blocks and dull on others, but it looks nicely together, in person.

If you would like to make some of your own, to give to others, you can find the pattern here: Hearts Creations.


On Saturday we went out with the kids to a local pond near their house. It's a great place to take photos but the river was overflowing, so a lot of the areas were saturated. We got a few good photos for them to use and always fun to spend time together.


This one was one of the better photos of the family, but the background was dull, so I took them out of one photo and put them into one I had taken, without them. It looks nice with the bright colors behind them.


On Sunday we went for a ride into Connecticut to check out an area that has a dam and a bike path. Once we got to Case Mountain, we ended up hiking to the top. It was well worth it, the views were spectacular. We were looking down at Hartford and the surrounding area.


The hike was up and down hills and a lot of rocky cliffs. It also follows a river, so a nice hike with beautiful views. Unfortunately the water was running low at the dam.


On one path, we ran into an old cabin. I can imagine how wonderful this place was, in it's day. I always did some research and found out, it was used in the movie, Animal. I am glad I haven't seen that movie, I might have skipped this hike.


On the way home we stopped at Yantic Falls. Color was starting to pop and always nice to see the falls. I hope everyone has a nice weekend. We are planning on going back up to the same area to explore the bike trail this time, or do some sightseeing if I am not up to peddling.


Friday, September 16, 2022

Friday Finish!


This hasn't been a great week for doing things, the kids were sick again and I think I have the same thing, since I was feeling better and it came back, so back on meds for me. The good thing is I spend more time working on projects and making progress on my second wheelchair quilt, so once that is done, I can put both together.

I decided to take a break and work up a quick project. This is a design by Susan who offers the free pattern on her site, Downeast Thunder Farm. I used wool from a thrifted jacket, which is thick and fluffy, so perfect for a black bat. I messed up the face on the first one and the second came out a bit better.  I used rusty wire for the feet and have them hanging on my shelve. I took the photo on the rack so you could see them better.


We were able to get to the beach few days.  I was able to get some paddling in, one day, but too cold to swim.


I found a few nice pieces of glass, the darker one in the middle is red glass. I hope you all have a nice weekend.


Friday, October 27, 2017

Friday Finishes!


This week seemed to go by quickly, and the weekend is here again and I am ready for some adventures, lol. We are going to explore a new area in Connecticut and see how the foliage is, then we can decide if we need to go up or down from there.

Of course I always have to have something to keep my hands busy during the week so I decided to try some bookmarks. And of course, I cannot follow directions, to save my life, so mine are a bit simpler.

I wanted to try them first to see how it worked and they were fun and quick to make. I may try the next with machine sewing on the edge, so I can put in a nicer ribbon. I used fabric from my scrap box and felt that I had won, lots of it to use up and it is perfect for bookmarks. They also have a stiffer felt at the craft store which would work nicely for this. I did a stiff kitty with it and use wool appliqué on top of that and it sews nicely.

The pattern is free at Craftsy, and it would be nice in appliqué too. This would be fun to leave in libraries and a tag can be easily attached with floss. If you are good at machine embroidery, you could  make a tag for the back. I do need to learn how to use my machine, I love the idea of making my own tags.

The bookmark is 7" long. Two pieces of wool are attached with a blanket stitch.
I would like to try some of my own designs that the girls can use to make for others and if you are interested, you can join in at DSmiles4Miles on Facebook. If you are interested, please fill out the questions, that lets me know you are a real person. Someone has made a request, but when I click on her Facebook page and there is nothing there, so it makes me suspicious.


Another item I finished was another block from Suzy's Sitcom, called Words of Wisdom. I skipped last months but I did like this one, so I will see when it is done, I like having an odd block so I can add my own saying and name for the recipient.

I am also working on another large stitchery and started a project from Cheri's Facebook group. She is so wonderful with sharing her patterns and making new ones for us to have for free, even though she is going through her own struggles right now.

I hope you all have a wonderful weekend, filled with adventures, and creating.


Friday, December 4, 2015

Twelve Days of Christmas: My Day!

I hope you have been following the Twelve Days of Christmas, each day there is a new tutorial or free pattern that you can make, just in time for Christmas. Thank you to Wendy for hosting the hop and all of the ladies who are participating. You can follow along each day by clicking on the banner.


I love to work with wool and I know most of you, love wool as well. I also love doing pieces with inspirational words and I think Joy is one of my favorites. I hope you enjoy my project and make one for yourselves to remember to keep Joy in your hearts, each and every day, this season.

I have given instructions, if anything seems confusing or you have a question, you can email me, anytime. The bells are about 5" long, but you can make them any size by enlarging or reducing the design.

This is  closer photo of the bells, the garland goes across my windows, with more bells and ties.


Have fun with the pattern, instructions are a guideline of how I made mine, but you can change it to suit your likes.

Instructions:

Materials:
Wool
floss
red berries (Beads, buttons or french knot.)
Rusty bell
2” styrofoam ball.
Red and green homespun 1/4” strips
Jute
Clothespins

Bells:
Cut out 3 bells, 3 bell backs, letters, candle, 2 leaves. Sew on the appliques with a blanket stitch.
Attach berries
Sew back and front with a blanket stitch, starting at the bottom and when you come around to the end, attach the bell with the same thread.

Balls:
Cut strips from the green homespun and wrap them around the styrofoam ball, until it is covered. Take a red piece and wrap it around the ball, twist around at the bottom and come around the opposite side, tie into a tight bow, leaving a few inches of the tail, to hang from the clothespin. 

You can buy pre-stained clothespins or soak them in walnut ink to age them. You can also have fun and paint them in christmas colors.

To make the garland, take a piece of homespun and a piece of jute and twist them together. Add  red ties if you like to fill in the spaces, and you can add larger rusty bells, as well. The length depends on how much you add to your garland and the size of your window, or area that you hang from.

Pattern Pieces:


Another fun thing to do for Christmas is baking treats that everyone will love. I have made these for years, they are great for parties and your guests who come to visit. They melt in your mouth and I haven't met anyone who didn't love them.

I hope you enjoyed visiting today and don't forget to follow along each day.


Monday, October 19, 2015

Weekend Wanderings!


I hope everyone had a wonderful weekend. We had beautiful weather and were able to get out and enjoy the foliage.

We drove into Connecticut and got off in the town of Putnum. It was a beautiful old town with some beautiful graveyards. I love looking at the old stones but we had a long day ahead, so just enjoyed a short stop to take some photos.

This tree was gorgeous, love how it stood out among the gravestones.


We didn't go too far when I saw this gate to another old graveyard. Someday I would like to go back to this town and take photos of the gravestones and explore the area.


This is the area behind the arch, the trees and fallen leaves, made a stunning view.


It was a nice ride up to Massachusetts, we followed the river and found some great places to kayak and bike, in the future. We went through a lot of old towns with old mills and when we got into Sturbridge, we found an indoor flea market and there was a beautiful waterfall near the parking lot.

I got a beam of light in this photo, it has rainbow colors in it, so I like to think that it is a little bit of heaven, shining down on us.


We do stop a lot and one area we found with a boat launch, had beautiful views and it was a great place to get out with Bean. We also found an area with a dam and a beautiful blue heron, but he flew away before I could get a shot.

The last place we stopped was in the Bigelow forest, they had beautiful trails to walk on and a beautiful pond to paddle on, this will be a place, we come back to. The view is from the picnic area.


Sunday was church and then a drive to do some shopping and a ride along the coastline. The local farm had a new hay sculpture, isn't she fun.


The day ended at Point Judith fishing area. They are still repairing the parking lot from Sandy, but it is larger now, so more parking and the perfect place to relax and enjoy the views. This is a panoramic shot, a fun way to get more of the scenery.


I also wanted to let you know about a beautiful free pattern from Deborah O'Hare of Quilt Routes. Deborah does beautiful art quilts and also sells some of her patterns so you can make your own art quilts. Today she is offering a free pattern by signing up for her newsletter. Her work will inspire you to create your own pieces, so visit her website and you can receive a free pattern, just for signing up.


Friday, May 1, 2015

Friday ……….


It was a long week that seemed to go by too fast. We had so many plans and didn't get any of them done. It was a week of getting out for walks and shopping and just keeping busy. One thing we did get to do, is find the perfect tree. A few friends sent us gifts along with the cards, so we decided to use the money for the tree and supplies.

I wanted a Kwanzan cherry tree because it blooms in mid-April, and the flowers look like carnations and grow in clusters. It is the perfect tree to bloom beautiful flowers for her birthday. I am putting it in the back yard so it has room to grow and then when it gets bigger, it will be a beautiful tree to sit under and we can start planning more landscaping for the yard, around the tree.

This is the top part of the tree, it already has beautiful blooms.


This is a stock photo of how the tree will look when it gets older.


We also got out for walks and Bean was loving exploring and going new places again.
Bean was so excited that he ran into a tidal pool and I wish I could have captured the expression on his face when he hit the cold ocean water.

This is his, "That wasn't the smartest thing I ever did," look.


We enjoyed the fresh ocean breezes and a good hike along the ocean paths. ( I need a haircut ;)


I was browsing on the web and found this fun set of trailer potholders. They look fun to make and she has a nice tutorial to follow along with the steps. It would be fun to make for your campers or as a gift for a friend. You can find the pattern for the potholders and other wonderful ideas for decorating and sewing at Suzy's Artsy-Craftsy Sitcom.


Monday, October 1, 2012

Fabric Apple Tutorial!


Whenever I see a new free pattern, I just have to try it. The apple tutorial can be found at Fabric Paper Thread. But.... we know I don't follow patterns, lol. So, I looked at Lorrie's pdf file and then I looked at the pdf pattern of apples that I got as a freebie, from Tennessee Ridge Primitives and went with the simpler version, since it only used 4 larger pieces. I guess you could say that mine are a combination of both patterns with a bit of my own style.

The one thing I did different on mine, was to tack down the center, after I stuffed it, to give it the depth on the top like a real apple. I cut out a leaf with wool, but you could use a fake leaf or pick one from outside. The stem is from a vine that grows along our fence, just right for an apple stem. I gave them a light walnut wash to tone down the fabric, so it give them a nice shaded effect.


Saturday, September 29, 2012

Improved Burlap Pumpkin?


Today I went to the craft stores. We are lucky, in that they are all in the same area. I go armed with coupons and stock up on supplies I use the most. One of my favorite items is quilt batting, I wait for a 40% sale and use the 20% coupon on that and get a great deal. I have a lot of tops to quilt and I want to make charity quilts, so getting batting this way, will build a stash for me;)

I was able to get moss for my pumpkins and I also found a pack of fall leaves to add to the display.
My husband but some stems that I had from an old wreath and I used those in place of the sticks.

I decided not to glue it down, so I can just throw the moss away and remove the stems for easy storage.
Hopefully the kitties won't try to eat it.

I tried different angles, but none showed off how nice they look in person. They are about 7" in diameter. You can find the tutorial to make your own at Country Quilts Blog.


Friday, September 28, 2012

Burlap Pumpkins!


If any of your follow Cheryl's blog, Country Quilts, you might have seen the wonderful tutorial that she created on her blog. It is a burlap pumpkin and it has easy instructions with photos. Of course, I cannot follow instructions, my brain isn't wired that way, lol.

I used white burlap, which seemed like a good idea, but too white, so I stained them with walnut. I have sticks that I collect and dry, and used pieces of those to make the stems. I don't have any status or toppings that I could add to mine, so for now, I just added the tie. I guess I need to hit the craft store. I didn't glue mine in yet, will wait till I get status and do it all at once. It is a fun and quick project and you can use different colored burlaps or fabrics.

Of course my camera decided to act up and the flash wouldn't work. I used an old wool yarn to tie the sides with.


Thursday, August 9, 2012

Wedding Pillow: Back Done!

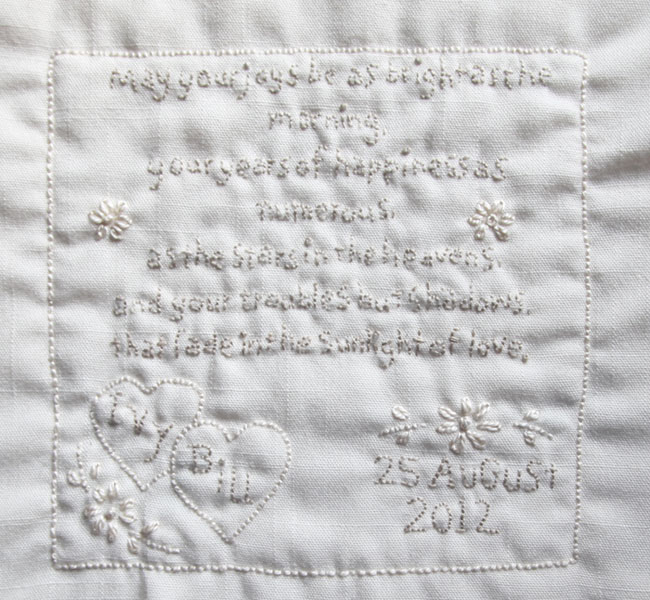
I finished the back of the pillow and it was a lot of stitching, but worth it. I wanted to add a saying, a blessing for their marriage since I would not be at this wedding. It is not as perfect as I would have liked, I was getting tired and my lyme is acting up, so it makes it hard to sew nicely. I took a quick photo, but it does look nicer in person.

I did the lettering in a darker shade so it would show, which is hard to tell by this photo. In bright light is is muted, but in darker light, you can read the saying.

It says: May your joys be as bright as the morning, your years of happiness as numerous, as the stars in the heavens, and your troubles but shadows, that fade in the sunlight of love. You are welcome to use the saying if you would like, for a pillow or something special for a wedding.

I also added the lace and the ring ribbon and flower, but I was not pleased with the stuffing, too bumpy looking. I will go to the store tomorrow to see if I can find something more suitable and was even thinking that I might be able to use quilt batting and fold it together to insert, inside the pillow for a more even look. I am also thinking of adding a satin cording, so will see what they have in the store, I think it will give it a nice finished look. I will take a photo of the finished pillow and scan in the design I used for the top, in case anyone wants to make their own.


Tuesday, June 12, 2012

Sailing Punch Needle Eyeglass Case Freebie!


I decided to make another case, this time for my sunglasses and make my own drawing. I just doodled a simple boat and some fun waves and this is what it looks like. You can reduce the size to fit a small camera or your cell phone, or make it into a pillow or wall hanging, whatever you would like. I used DMC linen, 4145, for the sails. The waves were done with a light blue floss, that was over dyed with a dark blue green.

To make the sunglass case, I sew a cotton lining to punch needle piece, front sides facing and leave the bottom open. When I sew it on the machine, I line my inner left side of the foot with the edge of the punching, so the needle sews along the side. Sometimes you catch the row, but it won't hurt anything.

Turn your piece, right side out and sew up the bottom edge by hand. Then cut a piece of wool a tiny bit larger than the front and using a blanket stitch, sew it to the edge of your front, leaving the top open.


Here is the pattern, not an exact, but  you can fix or change what you would like. It is also a bit crooked, so draw your lines first, then shift the boat to fit into your area. The drawing is done in reverse, so you can use it as it for punching. If you want to hook it or do something in appliqué, you will need to reverse it.


And, I had to show you this, nature is at it again. I found these two on my porch this morning, they stayed until noon, quite the long mating ritual;) It is a Giant Leopard Moth and I have never seen one around here. If you and your kids want to identify bugs this summer, visit Insect Identification. You can identify bugs and see photos of all types of insects.


Monday, January 16, 2012

Valentine Heart Freebie!

I was in the mood to make another heart and did up a little doodle to stitch on it.
I used two strands of floss and a stem stitch. When I was done, I cut out around the stitches and sewed it, right sides together to a piece of wool. Slit an opening on the back of the wool and fill it, then I covered it with a wool heart and a blanket stitch. A nice simple project that you can whip up in a night.


Here is the drawing that I used, I hope you enjoy making some for yourself or for a friend.


Sunday, September 4, 2011

Free Cross Stitch: Witch on the Moon


I wanted to make something for my wonderful visitors, who have put up with my paddling pictures all week and for all the good wishes you have sent me. I meant to make it smaller, need to remember how to use my program again, so I hope this is ok and you enjoy it. It is 139 x 130, done in 14 count, so you can make it smaller by using 18 count or higher. I added color so it would be easier to see, but not something I would actually use, lol.

I hope everyone is having a wonderful holiday weekend and hopefully I will get out for one more easy paddle tomorrow, before the rains come. Don't forget to come back on Tuesday night for a review and a giveaway!

Saturday, March 26, 2011

Bird and Nest!

Yesterday I wanted to try a free bird pattern I found on The DIY Dish. I like the idea of making one with a gusset and this one was so simple to make. I messed up the eyes, since all I had was some glossy plastic ones Tomorrow I will get better bird eyes at the craft store and replace them. I also want to antique it, that will cover up my sloppy sewing, lol. But, my daughter is over washing her weeks worth of clothes, so I will have to wait to stain it.

Then I went to work on a new piece to practice my machine applique and my machine sensor told me there is lint in the bobbin case and won't sew. No amount of cleaning helped, so she went to the shop today, I am sad. But, I will get the new upgrades while she is there, so that is good.

I decided to take back the kitty fountain, they didn't like it and hey, 8 bucks is a lot to me, lol. I bought my daughter a bath mat in the sale rack and found this wonderful nest to go with my bird. Perfect for spring decorating. I think I will try some more birds in different fabrics, and maybe reduce it to make some small chicks too.

Saturday, January 1, 2011

Giveaway Winners!

I will be nice and not write a long blog and make you scroll for the winnners;)

The first winner is SewCalGal!
Winner number two is Margaretha!

You can go to my ecrater site, link at the left, and choose a pattern for yourself. Then pick one for a friend and tell me which one and where to send it to.

Congratulations to the winners! I will try and have more contests and freebies this year, still coming off the bad flu, so recovery is slow. Today I received a lovely email from Rosa. She is from Spain and made a beautiful christmas pillow with my free reindeer cross stitch. I love to see your work, so please send me photos of your finished pieces.

Thursday, September 30, 2010

Freebie and a Contest!

I finished another chicken punch needle, so that I can offer two patterns, but still need to finish it off and make up the patterns.
So, while you have to wait, here is an old drawing I did a few years ago, that you can use to start your christmas crafting.
It can be punched, hooked, stitched, appliqued, or whatever you would like to try.

Now onto the contest. This is for followers only, yes I am plugging myself, since I need at least 100 followers to be considered for a go cutter and giveaway;) I know I have a lot of visitors each month, so now is your chance to follow and be entered into the contest. The winner will receive a free copy of my new pattern set, Fraktur Roosters. The contest will run until Sunday at midnight and the winner will be announced Monday night. Leave a comment to let me know that you want to be entered.