Showing posts with label vintage. Show all posts

Monday, April 15, 2019

Weekend Wanderings!


We had another nice weekend and it is so nice to get out again, I do hate being cooped up in the winter. On Saturday we were going to pick up the boys and on the way up, we stopped at the thrift store.

They get a lot of new items, so I grabbed a new beach pail and a stuff kitty that makes sounds and talks, and it's eyes light up, only a buck a piece. I also found a couple of quilting books. My fun find was a vintage nautical kit, from Maine, which I realized was three in one package. It will be fun to make some things with the items and add a few of my own.


We took the boys for a walk at the park, then a visit to the Umbrella Factory. They had a new photo display, so I had to get a photo.


Alex was loving all the animals and he would have to say hi to all of them. There were new pathways in the bamboo forest so they had fun exploring those.


 On Sunday they were dropped off so we took them to the beach. The boys loved playing at the beach and it was nice to just enjoy watching them play and hunting for glass together. Alex seems to love water, we have to watch that he doesn't go in, which he did at the pond, on the previous day, sneakers and all.


Nick loves to dig and he even found some glass in his hole. Afterwards we took them to the nearby park, lots of fun equipment for kids, but crowded and hectic. Nick had to try everything out.


It was a wonderful weekend with the boys and helped ease the pain of these weeks. Last week was the fourth year anniversary since we lost Danielle and tomorrow is her birthday, along with Easter, it is always the hardest month, missing her and wishing she were with us.


Tuesday, June 27, 2017

Art in Maine!


The one thing that you see a lot of in the Blue Hill, Stonington area is art studios. Lots of painters and pottery but I avoided most of the galleries since they are a bit pricey. Then there are the places that sell pieces that are slapped together to sell to the tourists, not what I would buy.

There is one place that is a must stop, if you are in the area. It is called Nervous Nellies Jams and Jellies. I knew they had art done by Peter Beerit, but I didn't realize how extensive the art and displays were, until we arrived. Peter came to Deer Island to start a jelly business and little by little, he has been creating sculptures from found items and building towns based on his travels.

The minute you come in, you are greeted by this lovely couple for a cup of tea.


Bill and Bean are spending time in the jail for smiling too much.


The sheriff is relaxing in his office, unaware of what is going on outside.


Unbeknownst to the sheriff, a jailbreak is in progress.


There are characters in every building and the surrounding areas. This guy is just chilling.


The piano Player....


Bill is getting his fortune told.


After a stop to get some jelly and maple syrup, we found an entire scene of characters, including a castle.


And back to Peter's studio, where a group of characters, were swapping the local gossip, on his porch.


It is a wonderful place to visit and Peter's art is sure to put a smile on your face. He is continually adding to his towns and characters, and there is much more than I have shown here, and more to come. He also has living characters, who visit the bird feeders, that is builds. This little guy was enjoying his perch, waiting for us to leave, so he could raid the bird feeder.

I hoped you enjoyed seeing a bit of Nervous Nellies with me. More to come this week, places we visited, our adventures and misadventures.


Monday, January 18, 2016

Monday This and That!


This weekend was spent hunting for furnishings for the new rooms. We hit stores and consignments and nothing that said, this is perfect for the room.

On Sunday we went to the antique barn which houses over 100 booths of vendors from antiques to primitives and lots of vintage items, as well as handmade items, so it is a fun way to spend a few hours.

I tend to look at things from a different perspective, not what it in front of me, but those hidden items that no one else notices. In one booth, I saw what I would call, a lot of junk, but holding some of that junk was a chair and it had a tag on it. I liked it, but wasn't sure, so I walked around and looked at some other booths and thought, I like it, and I better grab it before someone else does, so it came home with me. Bill took it up front to hold and everyone that saw it, loved it, so it shows, sometimes we miss the good stuff that is being used to display other items.

I am so glad I got it, it fits perfectly with the new desk. It has that beach, hand made, antique look. I actually pictured it in my mind and never thought I would find something like it. The leftover paint is blue and green, so a perfect match. Now I need to decide on a  chair pad, I will hook one for this seat and I am thinking of something simple with my thrift wools to give it a raggy look.


While we were browsing the booths, I spied this wonderful vintage table and thought of my friend Allie. She loves the old tables and I thought this one was unique with the yellow top. So, I took a photo for Allie.Allie is also hosting a joint sew along, so visit her blog and check out the Postcards from  Heaven BOM, I will definitely be making these.


Tonight was spent watching Nicholas. He is full of energy and Grandma is fighting off a flu. One fun thing is, he loves to help me unload the dishwasher, so he hands me the dishes from the bottom and that is a big help, even if it takes longer;) He loves to follow me around and check things out, maybe I will have a helper when I need to cut fabrics, later on.


Monday, January 12, 2015

Monday Musings!


I didn't get anything made this weekend, but I finally got all of my Christmas decorations down. The only problem is, my house looks empty since I don't have too many Valentine items. I did spend the weekend out and about, shopping and antiquing.

One of my favorite items is an antique yarn winder. One handle turns so you can wind your yarn, though I am not sure how they actually do it, and I got it, just because I liked it;) I put it on the shelf for now and draped a vintage crazy quilt piece, that a friend gave me. The two little figures are carvings, I did, years ago.


Another thing I was hunting for, was a primitive tree to use all year round. Last week I saw them on sale and when we went back, they were all gone, that is what I get for waiting. I found a similar one, though not as prim. I had some hearts that were given to me and I guess I will make some more valentine items to add to the tree and then next month it can become an easter tree.

I will redo the area with a table topper and valentine pieces, guess I need to get busy.


We also went to an antique store and I found a used basket that I can put in my sewing room and they also had lavender that you bought by the scoop, so I was happy to find that. I put a lavender sachet in my wool box and it keeps the wool smelling fresh. On the way back we stopped at a local pottery store, they had beautiful pottery but nothing I could use with my decor. The store is in an old mill building next to a river and the falls were beautiful to watch as they tumbled over the rocks.

I hope you all had a wonderful weekend and if you want something fun to make for Valentines, visit Bird in the Hand Primitives. Robin has a wonderful free pattern today. And when you visit, you will noticed the doll in her banner is the same as the one next to my tree. I was the lucky winner of her valentine doll and I just love her.


Friday, November 21, 2014

Friday Freebies!


I usually have a giveaway for my birthday, but this year the time got away from me. I also like to give everyone a gift, so I worked on a design this week.  These are for you, to use anyway that you would like, as gifts or for sale and you can change things if  you like.

I made up three different designs, the first can be done as a punch needle or stitchery.


This one is a star. I was thinking it might be fun to appliqué it with wool, onto a large stuffed star and sit it on a shelf. Or you could do it in punch, appliqué or stitchery and attach that to a large stuffed star.


And the last one is in the shape of a tree. Another piece that can be done in appliqué, stitchery or punched, either on a stuffed tree shape or onto a tree shape if you are punching it. I left the star on top as an idea, for me, I would add a rusty star to the top of the tree. You can use a star button or make a star with wool.

These designs were just done up, so I haven't had time to try some myself, so hopefully I can make some this week. There is no set size, I made them so they fill the paper, when printed out.


Today I had a nice day, relaxing and some fun shopping. One of the things I found today was an old washboard. I loved that it said Yankee on it, and on the other side, it has clearer writing for the company name. The only bad thing is I notice how musty it is. Would love ideas on how to get rid of the musty smell so I can hang it in the house. I know a lot of you buy antique pieces and would love to be able to enjoy them without the mustiness making me sick.

The board is a lot darker in person, the flash lightened it up.


Tuesday, July 22, 2014

Crosses Wall Quilt!

Today I stained my quilt with tea, but it didn't come out the way I wanted. I wrung out the quilt and hung it on a line and sprayed a diluted walnut stain on it, to darken it more. Unfortunately it doesn't show the staining with a camera. 

After I let it drip dry on the line, I threw it in a dryer to finish the drying and it came out with a  nice crinkly look. I had to iron it to get it to lay flatter, so that took out some of the crinkling.

The idea came from an antique quilt, and I added the circle and leaves to mine. It is done with fusible raw edge and hand stitched, then hand quilted with dmc pearl cotton. For the strings, I used precut strips from a log cabin quilt, that a friend was making and she sent me the extras. I wanted to keep it scrappy and the strips were perfect, for the look that I wanted. The middle and border strips were done with Barbara Brackman's line, 1862 Battle Hymn.

The quilt measures 28" x 28".  It is darker in person with stain spots from the walnut spray.


Here is a close up of the stitching. I do a basic stitch, no thought to keeping it perfect, but I try to be something uniform;)


And here is a link to the original quilt. I really like how the strings look and think this would be fun to do with a bed sized quilt and change out the middle with a different appliqué design. A great way to use up scraps. The photo is courtesy of Quilt Museum and Gallery.


Friday, February 28, 2014

Spring Wreath!


I finished making the wreath with the fabrics I showed you, then I had to decide how to decorate it. I decided to go with a vintage Easter pillow, but it didn't work out like I wanted. I used the print and press and a design that I found at Graphics Fairy. She has a lot of wonderful vintage designs that you can use for printing and making into decorations for your home.

The first design was ruined, not sure what happened, but it did not peel off properly and half the design was ruined, so I made another. I made another that worked this time, I pressed harder on the floor and I think that helped. I thought the design was large enough but once I set it inside the wreath it didn't fit snuggly, which I wanted so it would stay put.

I put the pillow on the wreath and added some flowers to show how the wreath looks. I am thinking that I may make a large sitting bird for it, what do you think would look nice on it? I wanted to do something for Easter, than change that out for spring so I could use it longer. Another idea I had was to print out vintage ornaments and tie them around the wreath.

I have it here on a wall, once I finish it, I will hang it on the front door.


Our house is full of the flu, my daughter had it, gave it to me and now my husband has it, so hopefully this will be the last one for the season. One thing that is nice when you are sick is to have wonderful friends who think of you and send surprises in the mail. It really made my days to have some wonderful new things that I can work with to make new creations with. It warms my heart to know my friends are thinking of me.

I have been practicing with my needle felting but realized I don't have many colors for animals, or fun colors for other projects. My friend Laurie spins her own yarns and uses roving and sent me some unspun rovings from her stash and a lot of her hand dyed, so I will be able to make some new critters now. The funny thing is, something she uses in the roving is something that makes Moki crazy, I found him and the box on the floor and he was rolling around in it, lol. It is now safely locked away from him.

There is roving under the roving, a whole box full. This will keep me busy for a long time.


 Today I received another package from my friend Mary. She knows I love to work with wool and had a pattern and wool kit that she was not going to use, so she passed it along to me. Not only was I surprised by such a wonderful gift but it is the same pattern and kit that I saw the other day and wanted to make, so I was thrilled.

I hope you all have a wonderful weekend.


Friday, February 7, 2014

Valentine Postcard!


I decided to try another postcard, using a different method. Since I printed out two smaller backings, I decided to try a practice run to see how it would work, so I kept it simple this time.

I started by finding old postcard backings to print out. They print out larger, so I reduced them until I got the right size. This one was made with a smaller version. You can find the free postcard backings at Fuzzimo. I used card stock and printed out two at a time.

To make the applique piece, I used a fun art print that I won from Sauder's Fabrics. I used Pellon heavy fusible and ironed the piece to that, then added the appliques using a medium weight fusible. Once I had those on, I sewed down the appliqués. Once the appliques were done, I added a piece of batting and a scrap piece of fabric to the back of the batting, so I could do free motion on a smoother surface. When all of the quilting was done, I added another piece of fusible and attached the card back and sewed it around the edges. I think it would have been easier to use fusible web, to save on cutting and attaching so many fusibles, but the nice part is, it gives it a nice quilted card look and stays thin and stiff, so perfect for sending in a card or envelope.

I think the card stock was what actually gave it, it's stiffness, so you could use peltex type products, as well. I also tried a tighter, small blanket stitch and it really chewed into the card stock, so sewing the edges with that, is something I need to work on. I also forgot to stitch an eye on the bird, so I glued a silly eye on, lol.

This is a great way to make cards if you want a quilted look and I am thinking that I could sew the top together first and then just attach the back, on last, without stitching, will have to see how that works out.

The design is just a simple heart and bird, hand drawn, so no pattern needed. I used variegated red to black for the outer stitch. I also wanted to write the word love, in free motion, but forgot that too.


Here is the back of the card. You can see where some of the card stock tore at the edges. I started out in the wrong spot, then figured out where to place the edge with the foot, then my bobbin ran out, so that didn't help. I love the look of the card though, nice antique look and you can use printer fabric to make them, as well.


This week we got snow, then sleet and rain, so the snow is icy and hard. I went out skiing in my back yard, but I really had to watch myself and the areas that were sunken in, but I just went slow and did ten laps this time. The kitty that my neighbor left when she moved is still hanging around, he comes every morning for food and water and I think he is also being taking care of by the new neighbors at night. He must be doing ok, he was following me around the yard and being silly.


Wednesday, September 25, 2013

Vintage Fabrics and Apples!


My Sister in Law used to craft and as she cleans, she finds things and gives them to me. This time it was books and fabric. Most of the books are old patterns and magazines that aren't my type or ones I can reuse into new things, so those will go to the salvation. I am not sure on the fabric. The blue with flowers is a bit stiff, reminds me of curtain or pillow fabric, so wondering if it would be a good backing for quilts, for my daughter. I had to wash it, since it smelled like musty moth balls.

There is at least 5 yards or more of the light blue floral.


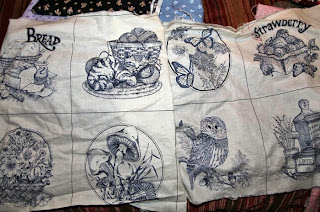
She also had this panel with some fun prints. I hated to wash it, but the smell was horrid. It might be fun to make something out of it.


I am still using my big bag of apples. I made apple cookies and apple crisp. Today I made apple burgers and apple butter. It was the first time I have made it and I used all of the apple so the natural pectin thickened it nicely and it tastes good, even without sugar. It will be nice to use on rice cakes. I am still looking for the original recipe for apple burgers. I sauté onions and grated apples in butter, then add that to the hamburger and bread crumbs, then you make small patties and back them in the oven, my family loves them.

For the apple butter, I cooked the apples for about 4 hours, than cooled it down, put it in the blender and then cooked it for another two hours.


Tuesday, January 29, 2013

Primitive Pillows from Free Graphics!


A while ago, I had bought some Inkjet fabric sheets and decided it was time to try them.
I didn't know what I had bought, it says, sew in sheets, so I think I got the wrong type and wasn't sure if they would work.

The sheets are a bit stiff but that makes them nice for printing. They do print out nice and clear and the colors really come out nice. After you print them, you let them sit to dry the ink, then heat set them with an iron. I waited a day and then ran them under cold water, which sets the colors. The only thing was, the red shades did run, but as you can see by the photos, antiquing them, took the hue away.

This design I printed out, about a year ago and I think I got it from a free postcard site.


I found this alphabet print at The Graphics Fairy, loved these two the most and had to make them into pillows. Love the old time look to them.


The last two are also from The Graphics Fairy. I printed out too large, but they still make nice pillows to add to a spring or Easter setting. If you visit The Graphics Fairy, you can find a lot of wonderful designs to print for pillows or altered art pieces, lots of possibilities.

I really had fun making these and was so glad when they came out so nicely. Next time I will try the regular fabric sheets to see how those work.